7.1 Playbacks
7.1.1 The Playback-Fader Labels
The Playback Fader Labels are shown in the lower part of the screen.
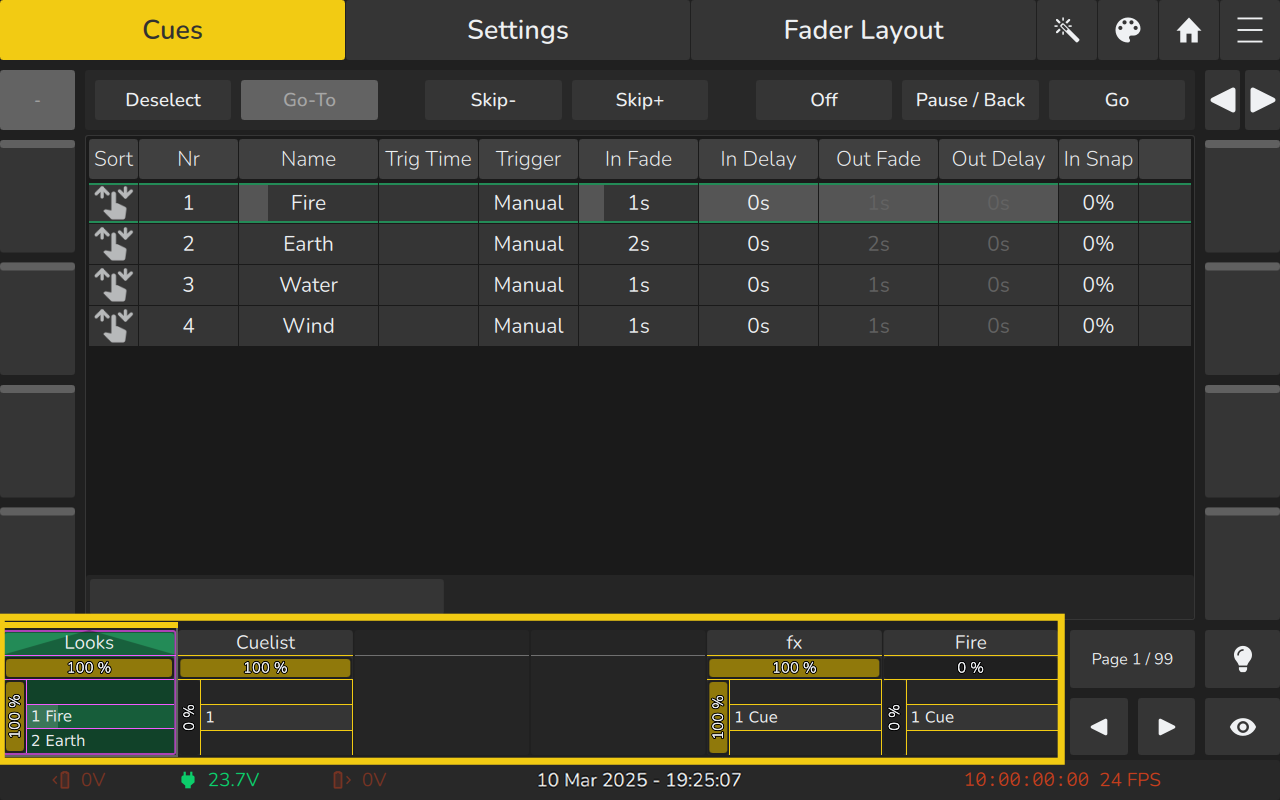
The Fader Label itself provides several layers of feedback to you:
| Item | Meaning |
|---|---|
 | This Playback has the name “Not Running” and is not being played back. |
 | This Playback has the name “Selected” and is selected but not running. |
 | This Playback has the Name “Running” and is switched on and running - or: played back. The triangle indicates this Playback is displayed in the Cuelist view. |
 | This Playback has the name “Paused” and is Paused. |
 | This Playback has the name “Outfading” and is currently out fading (Off-Time setting when switched off). |
 | This Playback is empty. |
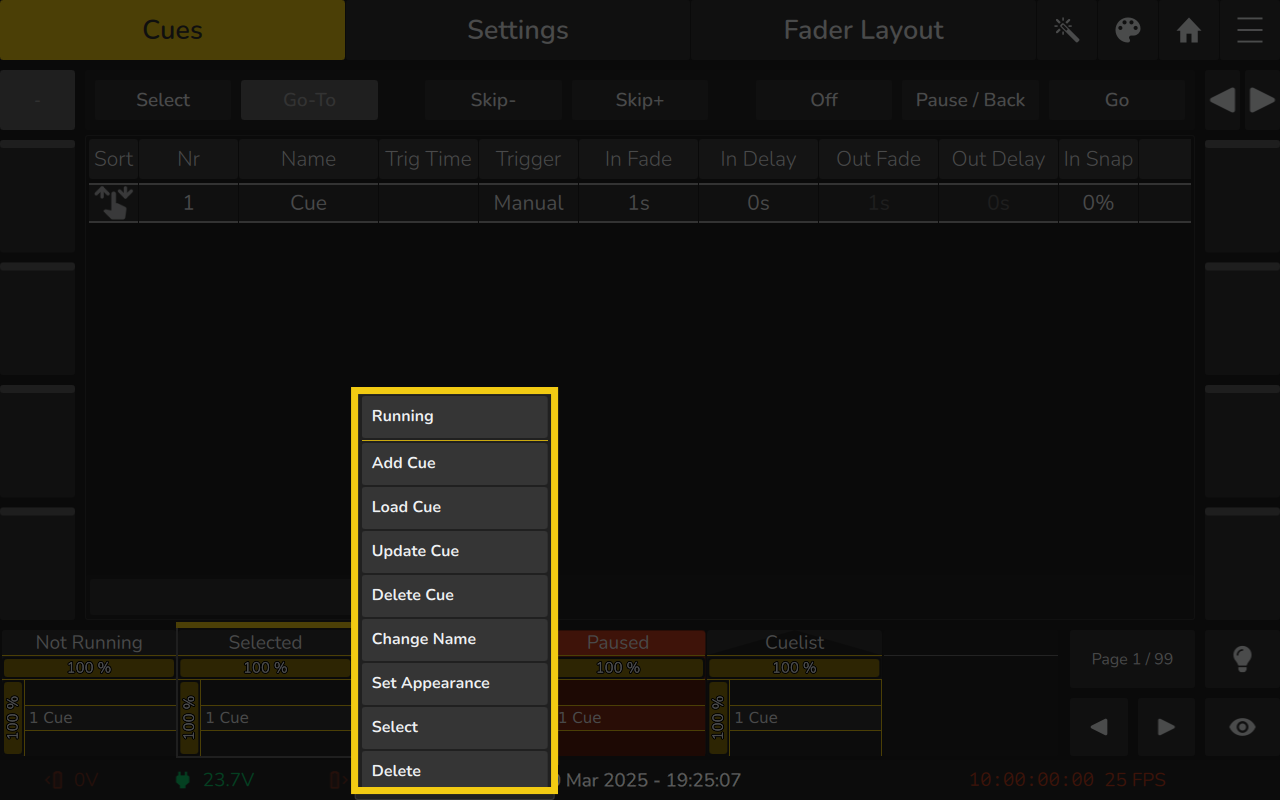
7.1.2 The Playback Item Long-Click Menu
The long-click menu offers different actions depending on whether it is used within an empty or non-empty Playback Item. It may be opened by long-clicking on an empty or existing Playback Item.
- Empty Item: Provides the option to record a new playback.
- Non-Empty Item: Offers options to manage the selected playback, including:
- Add Cue
Adds a new Cue to the Playback. - Load Cue
Allows cues to be loaded to the Values View for further editing. - Update Cue
Allows for programmer content to be merged into, removed from or to replace an entire cue with the programmer content. - Delete Cue
Allows to select one or more cues to be deleted. - Change Name
Changes the Name of the Playback. - Set Appearance
Can be used to set a colored border for the Playback Item. - Select Playback
Selects the Playback for the Master Pause, Go+ and Go- Buttons. - Delete
Deletes the Playback after displaying a confirmation message.
- Add Cue
7.1.3 Recording Cuelists and modifying Cues
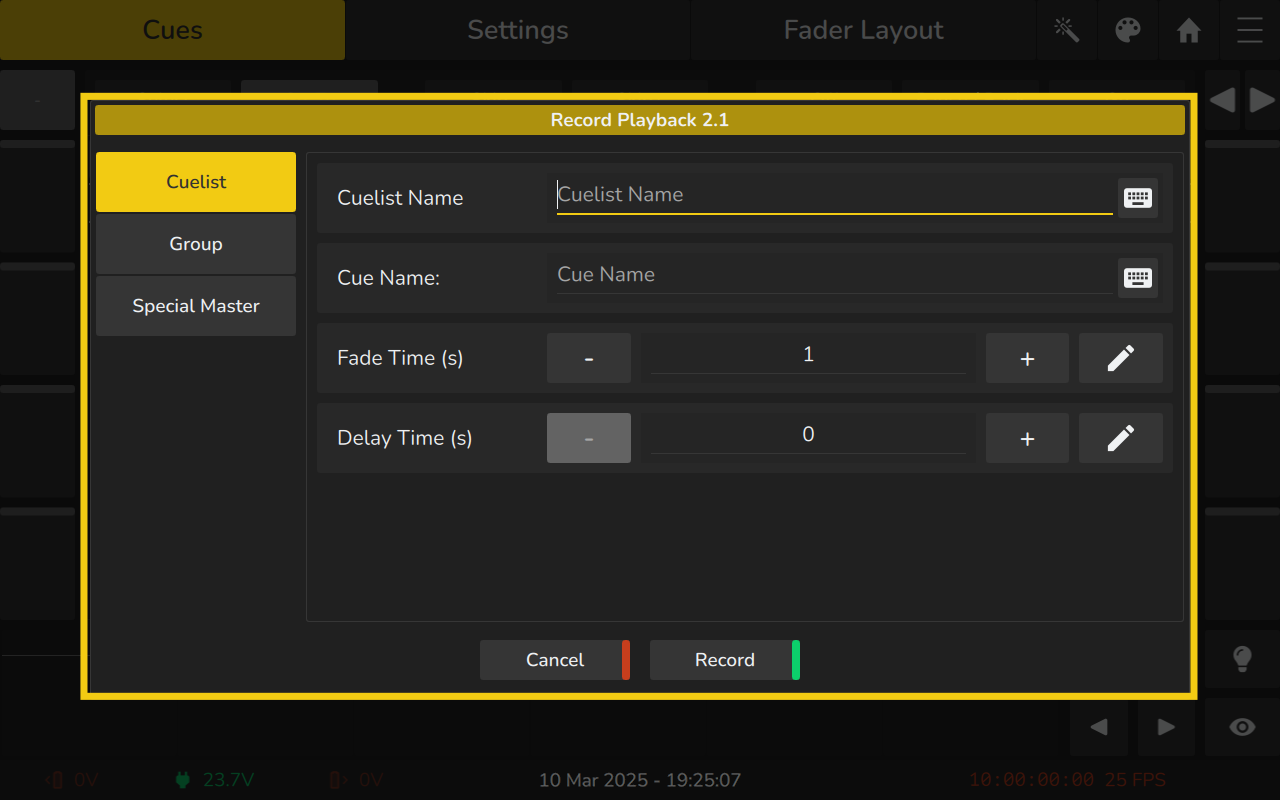
Recording Cues to a Playback
To record your first cue on a playback:
- Select the desired fixtures.
- Set values for the selected fixtures.
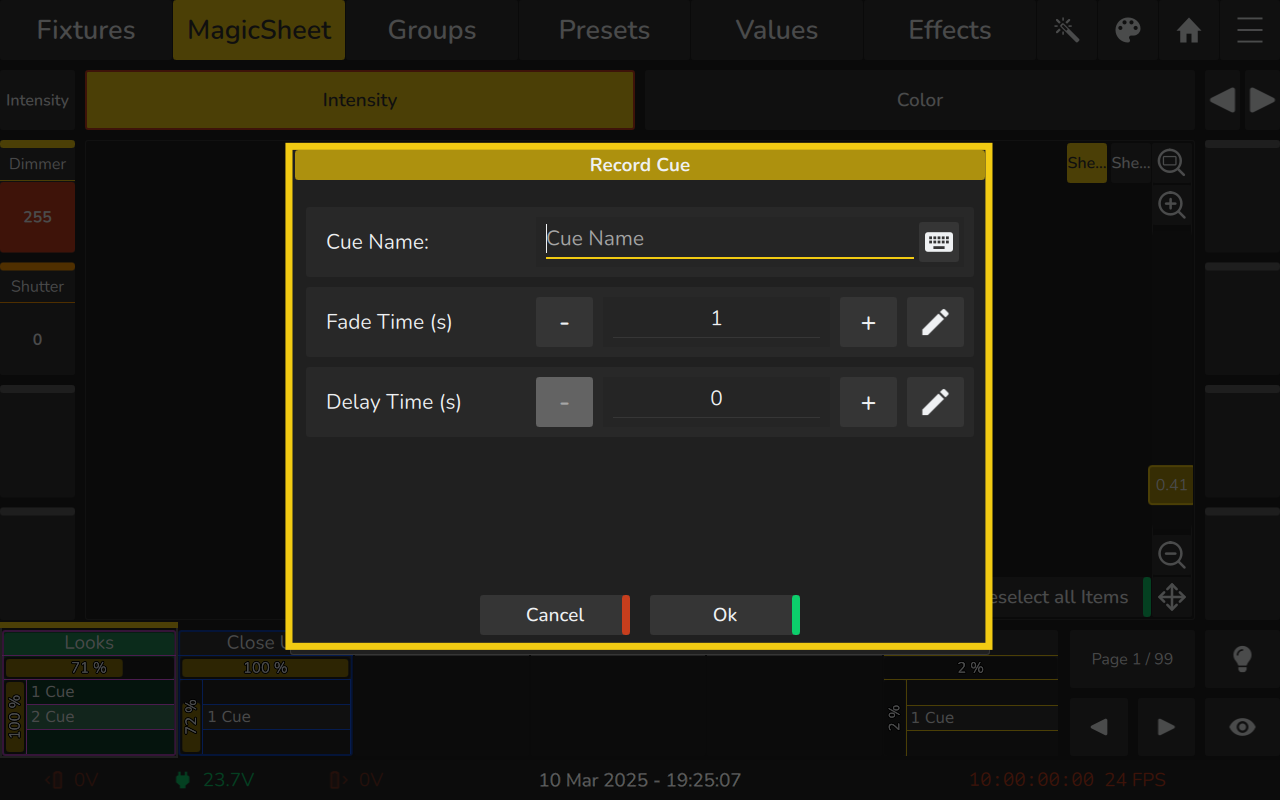
- Press the Record button on the front panel, then press the fader or encoder button. Alternatively, long-press an empty Playback Fader Label.
- A dialog will appear, allowing you to choose what to record and adjust basic options. Ensure Cuelist is selected on the left-hand side. Enter a name for the Cuelist and Cue, then set the Fade and Delay times. Click Record in the Dialog when finished.
Only values that are touched and active will be recorded.
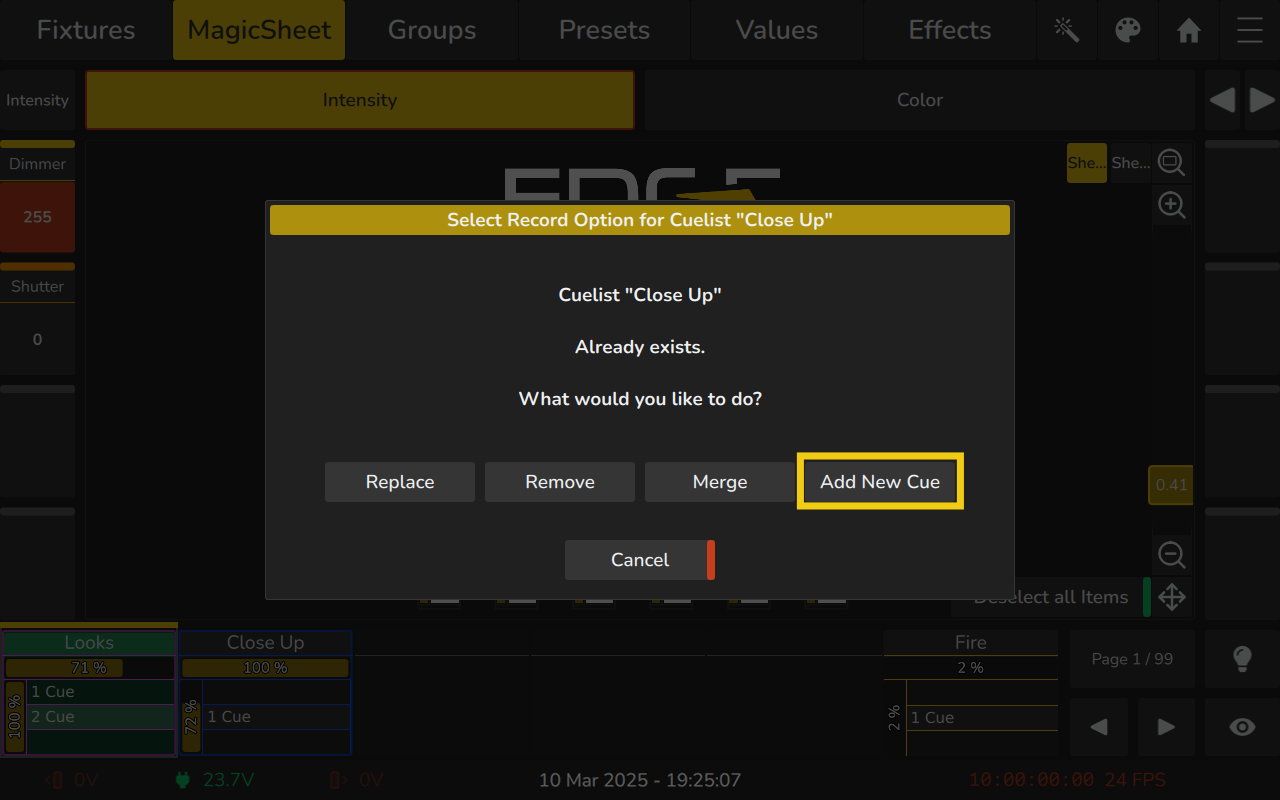
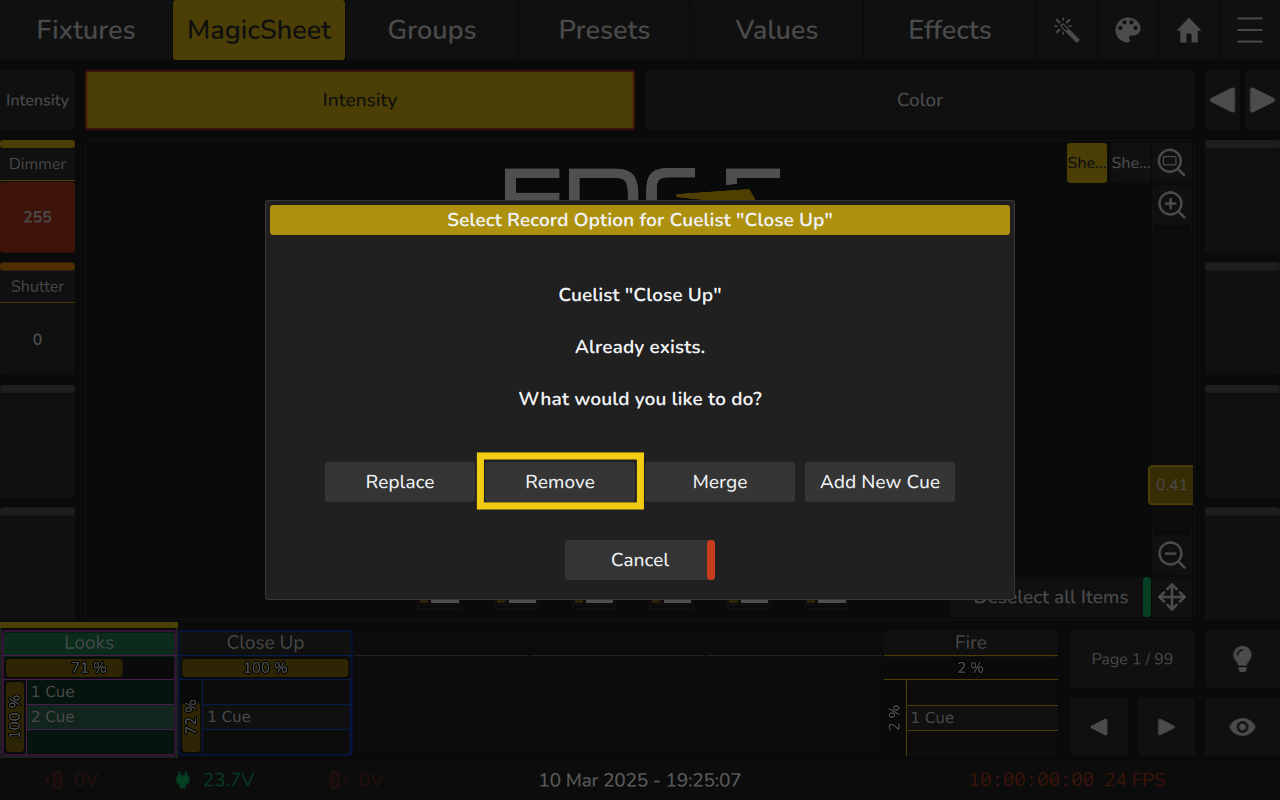
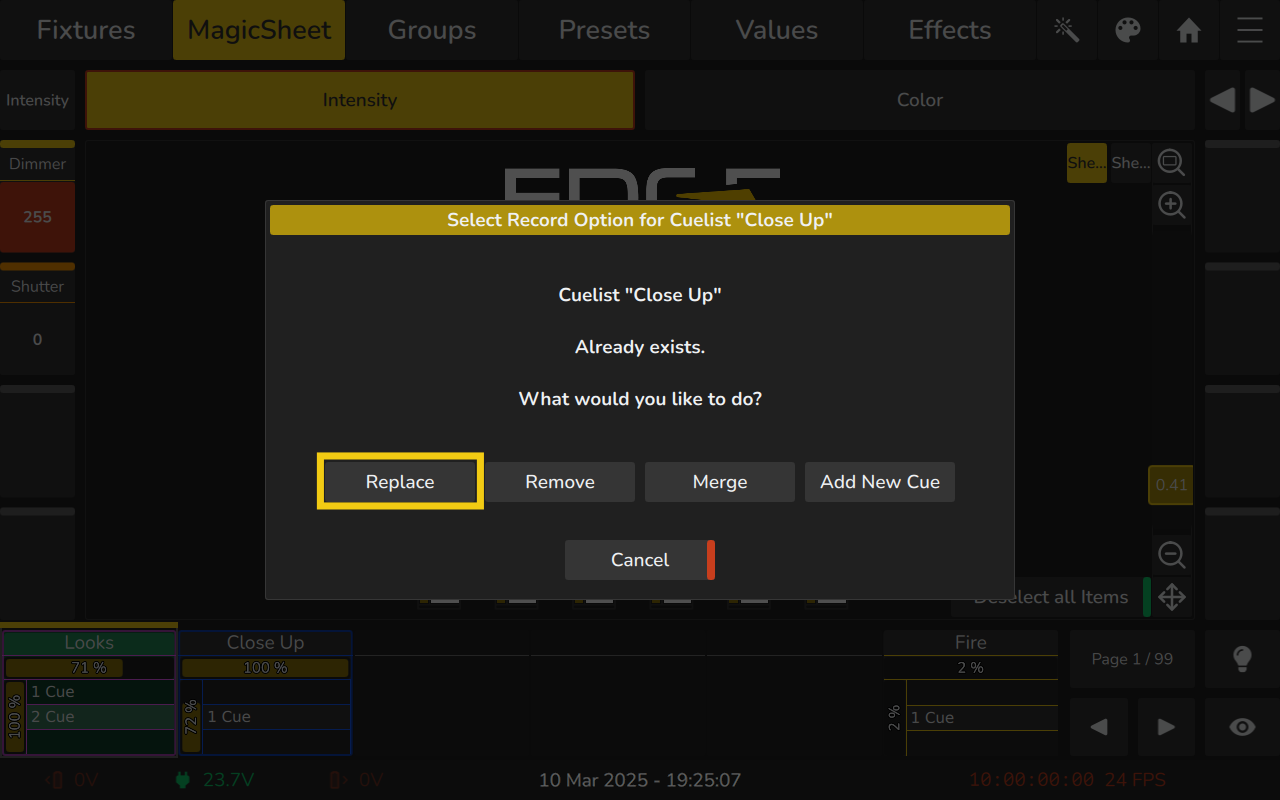
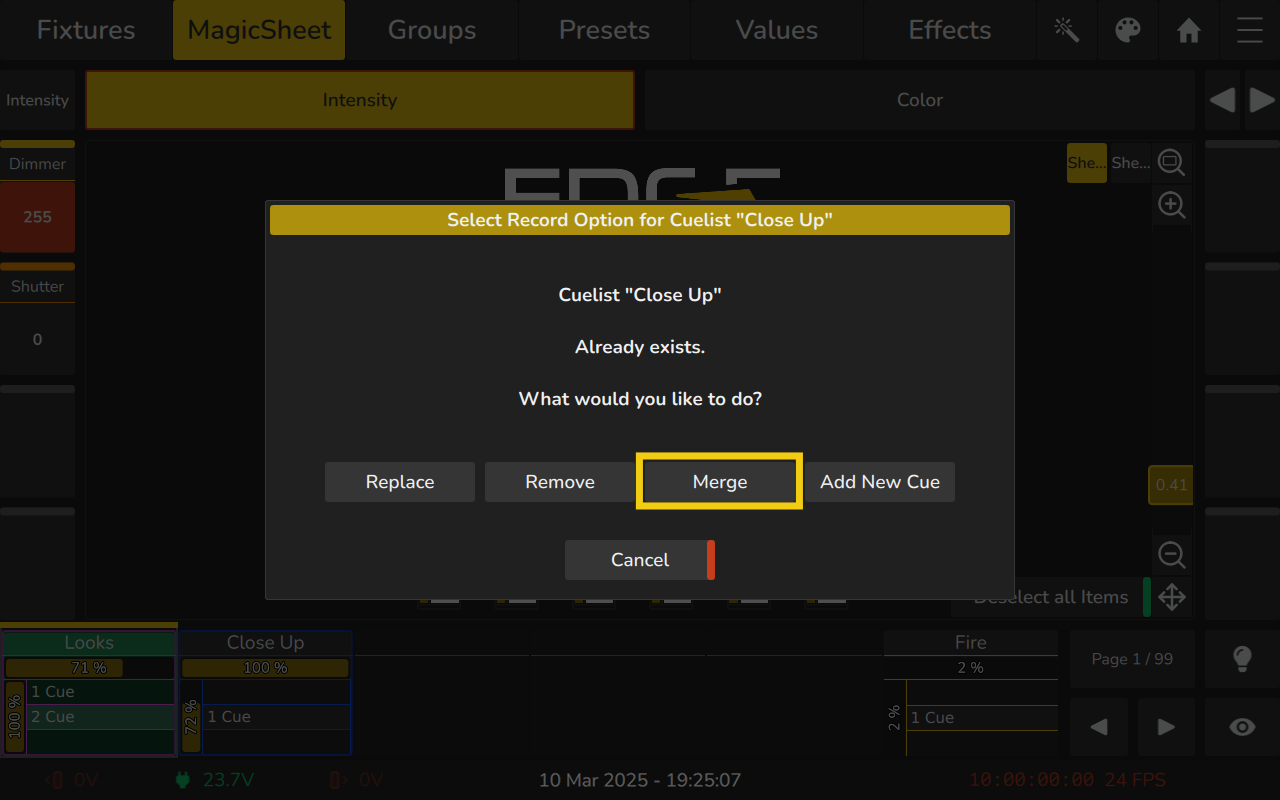
Recording additional Cues to a Playback
To store another cue in the same playback:
- Press the Record button on the front panel, then press the button or fader label of the playback to which you want to add the cue.
- Alternatively, long-click the fader label and select Add Cue from the long-press menu.
If the playback contains only one cue, a window will appear asking what action to take. If you use the Add Cue option, only a dialog to enter name and timings will be shown.
Removing Values from a Cue in a Playback
To remove values from a cue in a playback:
- Select the desired fixtures.
- Set values for the attributes you wish to remove from the cue.
- Press the Record button on the frontpanel repeatedly until the command line reads Remove.
- Tap the button or fader label of the playback containing the cue.
If the playback has multiple cues, a list will appear. Select the desired cue.
Only values that are touched and active will be removed from the selected cue.
Alternatively, you can long-press the fader label and select Update Cue. If the playback contains multiple cues, choose the cue from the list and click Remove. You can also select a cue directly in the Playback View. (See 7.2.3 Playback View Cues Table for more details.)
Replacing Values in a Cue in a Playback
To replace values in a cue in a playback:
- Select the desired fixtures.
- Set values for the attributes you wish to replace in the cue.
- Press the [Record] button on the frontpanel repeatedly until the command line reads Replace.
- Tap the button or fader label of the playback containing the cue.
If the playback has multiple cues, a list will appear. Select the desired cue.
Only values that are touched and active will be replaced in the selected cue.
Alternatively, you can long-press the fader label and select Update Cue. If the playback contains multiple cues, choose the cue from the list and click Replace. You can also select a cue directly in the Playback View. (See 7.2.3 Playback View Cues Table for more details.)
Adding or Changing Values in a Cue in a Playback
To merge values into a cue in a playback:
- Select the desired fixtures.
- Set values for the attributes you wish to add or change in the cue.
- Press the Record button on the frontpanel repeatedly until the command line reads Merge.
- Tap the button or fader label of the playback containing the cue.
If the playback has multiple cues, a list will appear. Select the desired cue.
Only values that are touched and active will be added or changed in the selected cue.
Alternatively, you can long-press the fader label and select Update Cue. If the playback contains multiple cues, choose the cue from the list and click Merge. You can also select a cue directly in the Playback View. (See 7.2.3 Playback View Cues Table for more details.)
Deleting Cues from a Playback
To delete a cue from a playback:
- Long-press the Playback Fader Label.
- Select Delete Cue.
- If the playback contains multiple cues, a list will appear. Select the cues you want to delete and click Delete.
Alternatively, you can delete cues using the Delete button on the console frontpanel directly in the Playback View. (See 7.2.3 Playback View Cues Table for more details.)
Inserting a Cue Between Cues in a Playback
To insert a cue before another cue, use the Playback View. (See Inserting a Cue Between Cues in a Playback for more details.)
Reordering Cues in a Playback
To reorder cues within a playback, use the Playback View. (See Reordering Cues in a Playback for more details.)
Copying a Cue in a Playback
To copy a cue in a Playback, use the Playback View. (See Copying a Cue in a Playback for more details.)
7.1.4 Working with Group Masters
When a Group is assigned to a Playback, the fader will act as a master dimmer, dimming down programmed values or values in the programmer for the fixtures contained in the group.
In case the faders are in a different physical position than the value, the ones that are different from the actual value will have their LED blinking as an indicator. The fader values from before are remembered and you must move the fader physically to this position.
The buttons of the fader and encoder can be used to select or deselect the group.
Assigning an existing Group to a Playback Fader from within the Groups View
To assign an existing Group to a playback fader from within the groups view:
- Make sure the Groups View is shown.
- Long-press on the group and select Create Group Master.
- Tap the playback label or press the button of the destination playback.
Alternatively, press the Copy key on the console front panel, tap on the group and then on the playback label or button of the destination playback.

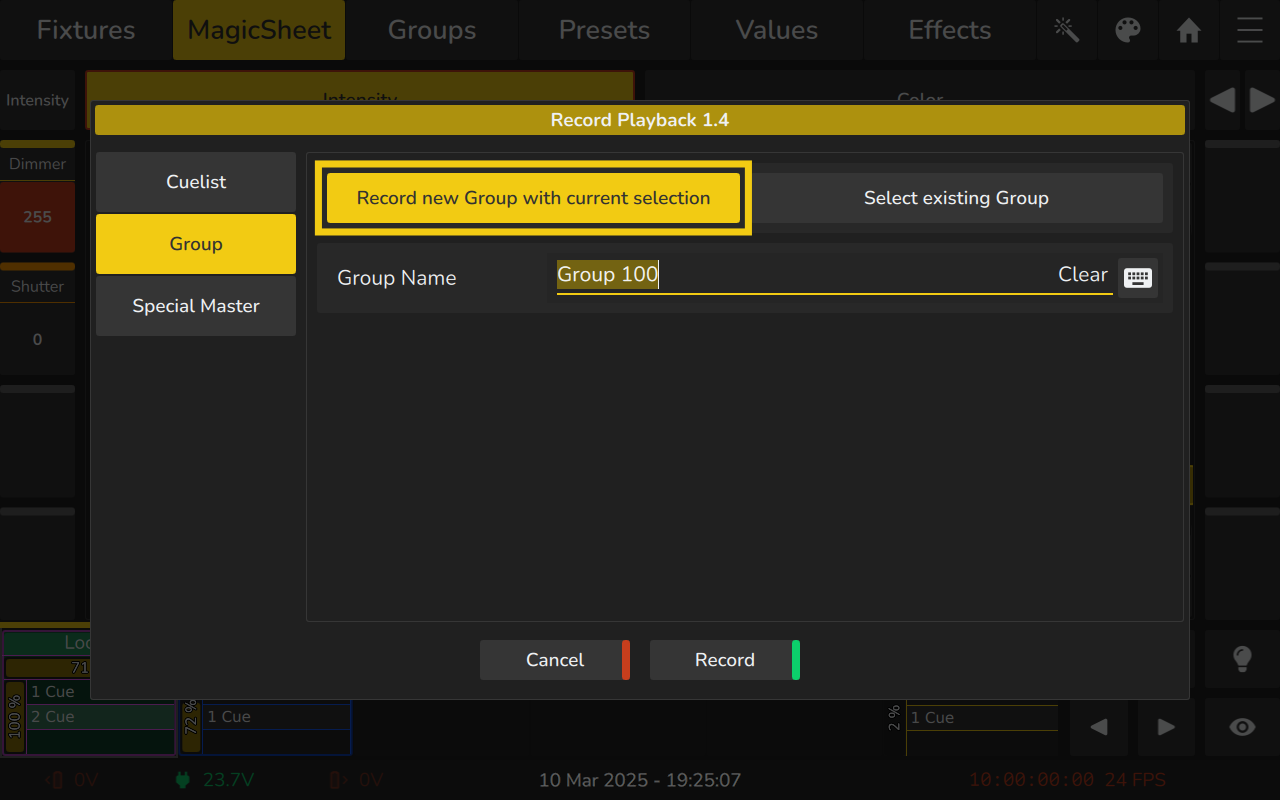
Recording a Group to a Playback Fader from within Record Playback Dialog
To assign a new or existing Group to a playback fader from within the record playback dialog:
- Press the Record button on the front panel, then press the fader or encoder button. Alternatively, long-press an empty Playback Fader Label.
- A dialog will appear, allowing you to choose what to record and adjust basic options. Ensure Group is selected on the left-hand side.
- Either choose to create a new Group or select an existing Group.
- Click Record in the Dialog when finished.

7.1.5 Working with Special Masters
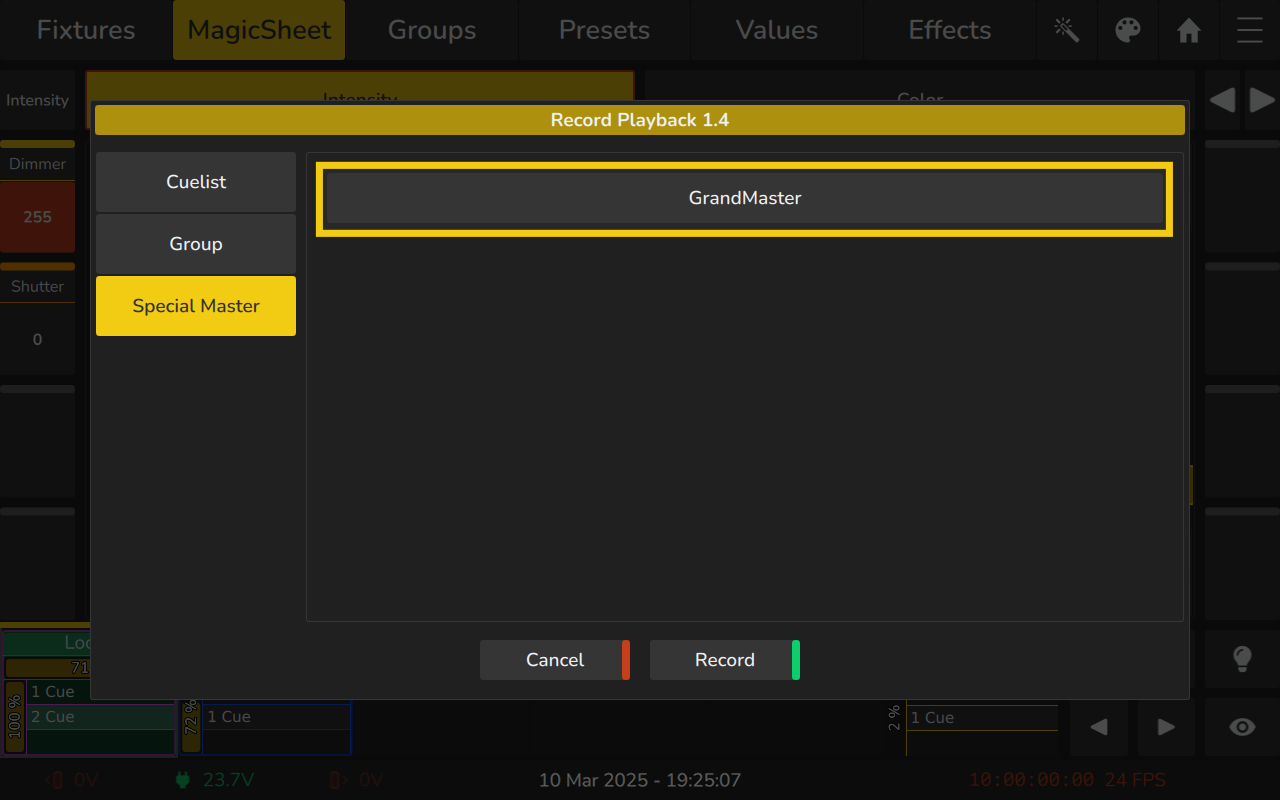
Assigning a Grandmaster Fader to a Playback
The Grandmaster Fader will proportionally dim all fixtures which have set React to Master in the Patch Table to Yes.
To assign a Grandmaster / Master Dimmer Fader:
- Press the Record button on the front panel, then press the fader or encoder button.
Alternatively, long-press an empty Playback Fader Label. - A dialog will appear, allowing you to choose what to record and adjust basic options.
- Ensure Special Master is selected on the left-hand side.
- Select Grand Master on the screen.
7.1.6 Organizing Playbacks
Copying a Playback
To copy a playback:
- Press Copy on the console front panel.
- Tap the button or playback label of the playback you want to copy.
- Tap the button or playback label of the destination playback.
Moving a Playback
To move a playback:
- Press Copy on the console front panel twice. The command line will read Move.
- Tap the button or playback label of the playback you want to move.
- Tap the button or playback label of the destination playback.
Deleting a Playback
To delete a playback:
- Press Delete on the console front panel.
- Tap the button or playback label of the playback you want to delete.
- A confirmation screen will be shown.
Alternatively, you may long press on the Playback Label and select Delete.