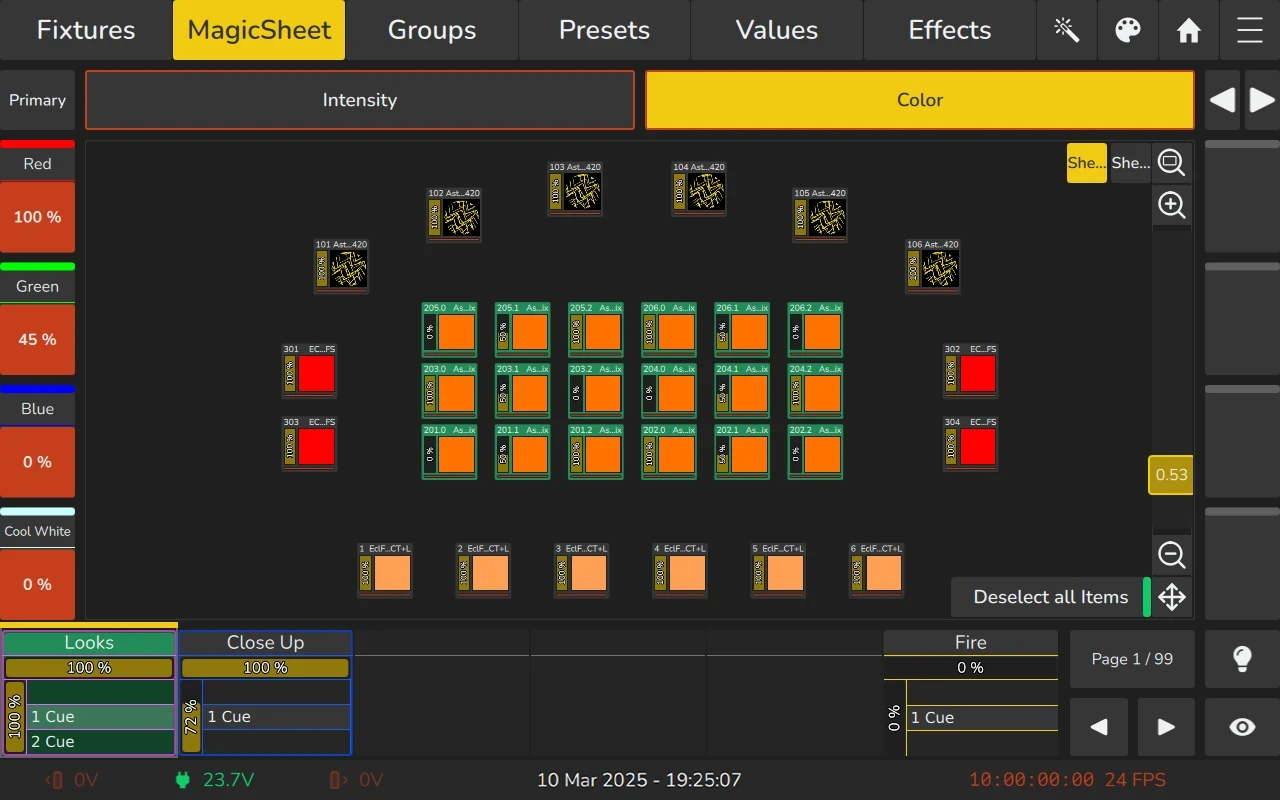
6.2 The Magic Sheet View
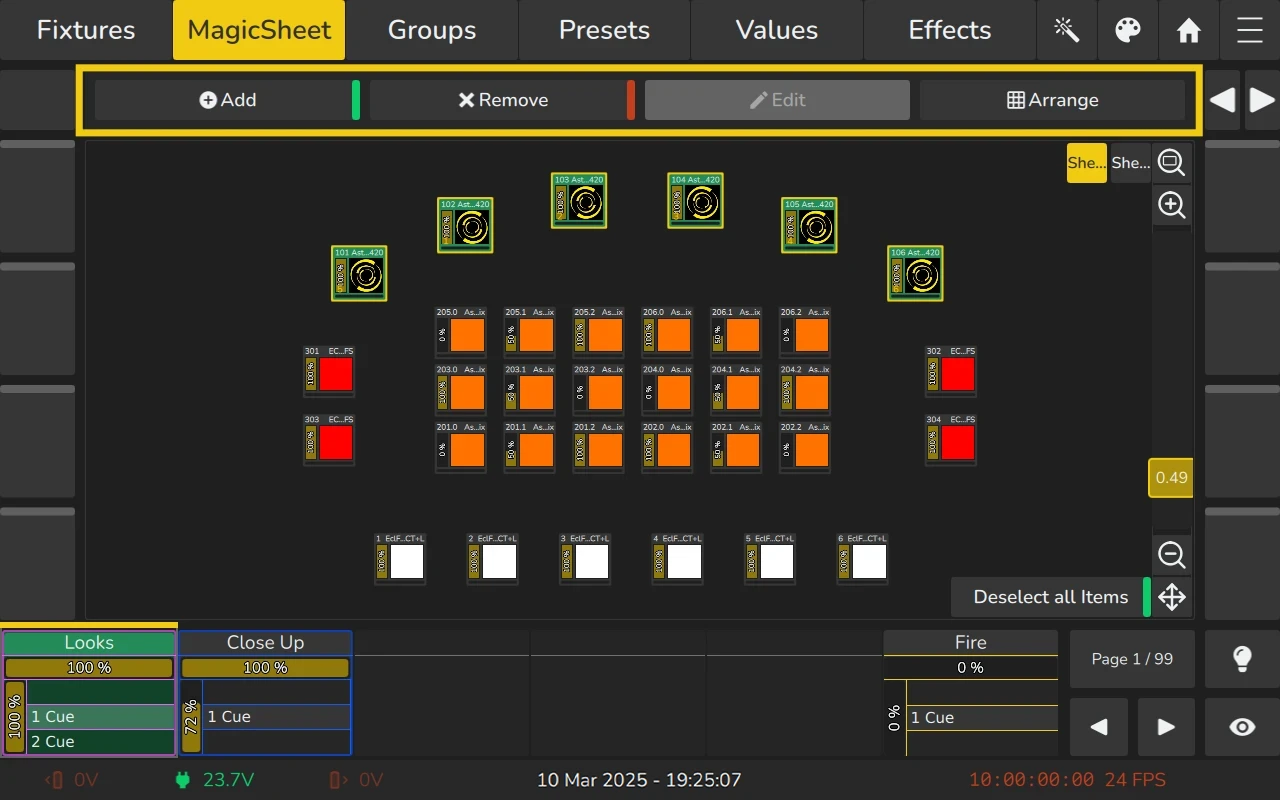
The Magic Sheet View on the Home Screen is a powerful tool for organizing and selecting fixtures in a way that suits your workflow. This feature allows you to create a highly customizable and visually intuitive representation of your lighting setup. Fixtures can be arranged freely, whether you prefer to mimic the physical layout of your stage or simply create a logical grid or pattern.
To open the MagicSheet View:
- Click on the Home
 button.
 - Select MagicSheet from the buttons on top.
Edge provides two independent Magic Sheets, offering flexibility to create multiple layouts for different purposes or workflows. You can easily switch between these sheets using the Sheet Buttons located in the top-right corner of the Magic Sheet View.
In addition to fixtures, Magic Sheets support the addition of groups, labels, and images. This enables you to enhance clarity, quickly access key components of your design, and incorporate visual references.
Items contained in the Magic Sheet behave similar to their counterparts in the corresponding views of the Home Screen.
In addition to selecting items by clicking on them, fixtures can be selected by dragging a selection rectangle. The direction in which the selection rectangle is dragged defines the order of the fixture selection.
You may also select items that are inside a label by clicking on the label.
Whenever fixtures, labels, or groups are selected, a Deselect all Items button is shown on the bottom right part of the screen.
6.2.1 Navigating the Magic Sheet View
Navigating the Magic Sheet View is intuitive and user-friendly. You can move around the sheet and adjust your view using the buttons and sliders located on the right side of the Magic Sheet interface.
Additionally, familiar touch gestures, such as pinch-to-zoom and two-finger swipe for panning, allow for smooth and precise navigation.
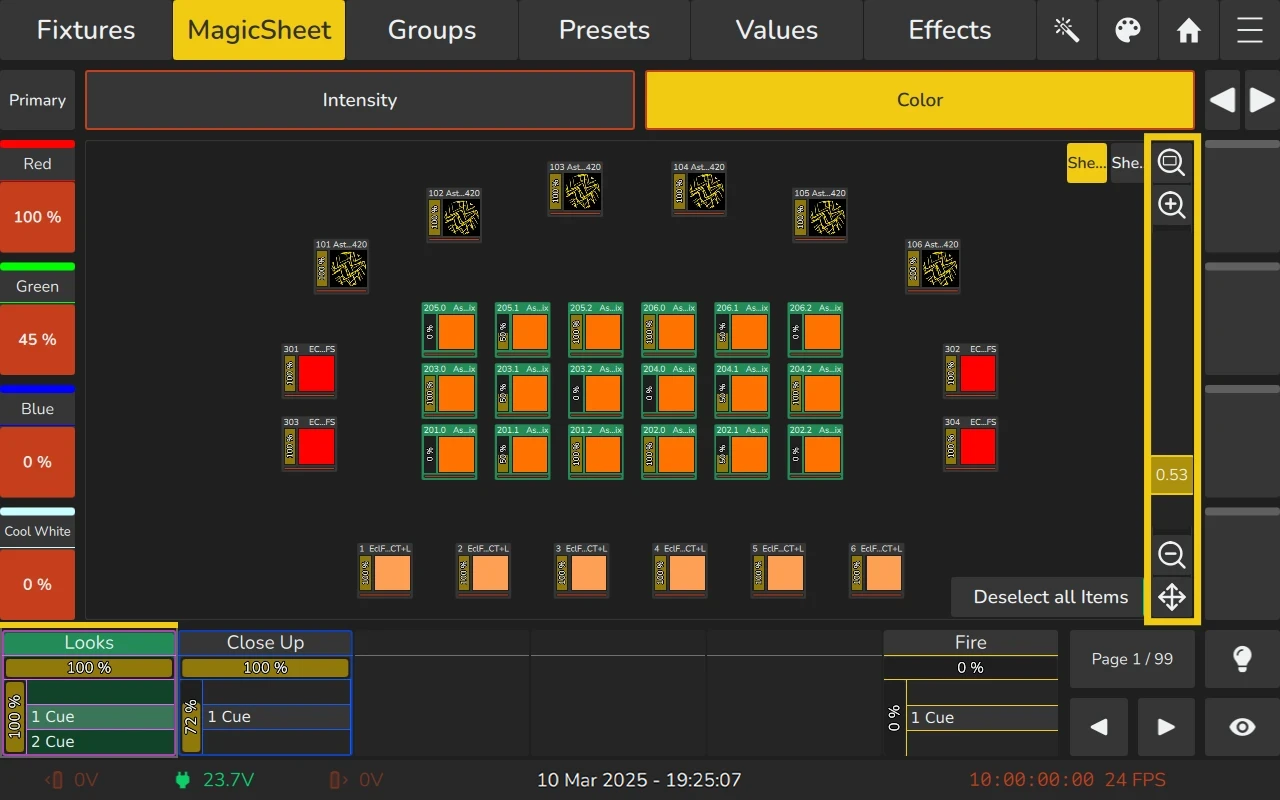
The navigation controls in the Magic Sheet View provide a range of tools to adjust and navigate the viewport. Alongside a slider for zooming in or out, the following buttons are available:
| Icon | Name | Action |
|---|---|---|
 | Zoom Fit | If no fixtures are selected, this button zooms out and adjusts the viewport to display the full extent of the Magic Sheet View. If fixtures are selected, it centers and zooms the view on the selected fixtures. |
 | Zoom + | Increases the zoom level, enlarging the items displayed. |
 | Zoom - | Decreases the zoom level, making the items smaller. |
 | Move View | Activates the "Move Viewport" mode, enabling you to drag and reposition the view for a customized perspective. |
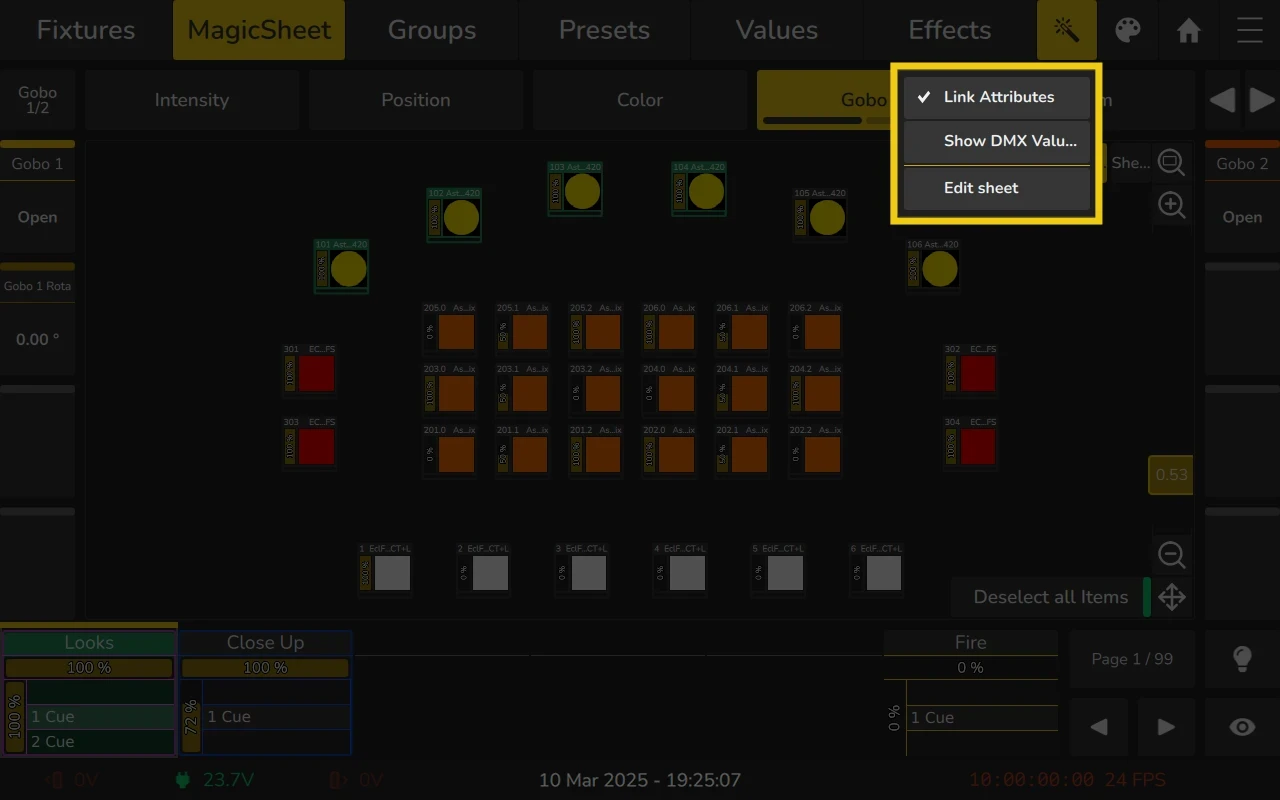
6.2.2 Magic Sheet Context Menu (Magic Wand Button)
The Magic Sheet View Context Menu offers tools to customize the Magic Sheet View. You can access this menu by clicking on the Magic Wand  Button within the Magic Sheet View.
The menu includes the following options:
- Link Attributes:
This option allows you to link attributes of selected fixtures. This ensures that for example when “Red” is changed, the corresponding other colors are touched as well. - Show DMX Values:
Enable this option to display DMX values for fixtures in the values table and encoders instead of ranges. - Edit Mode:
Toggle Edit Mode on or off to modify the layout and configuration of the Magic Sheet.
6.2.3 Editing the Magic Sheet
To add, edit, or delete items in the Magic Sheet, you must first enter Edit Mode:
- Navigate to the Magic Sheet tab.
- Click on the Magic Mand button.
- Select Edit Sheet from the Magic Sheet Context Menu.
Once you enter Edit Mode, a toolbar containing all options for modifying the Magic Sheet will appear. Note that some of the buttons are only enabled when items are selected.
In Edit Mode, selected items can be moved by using drag-and-drop. Simply click and hold the item, then drag it to the desired location.
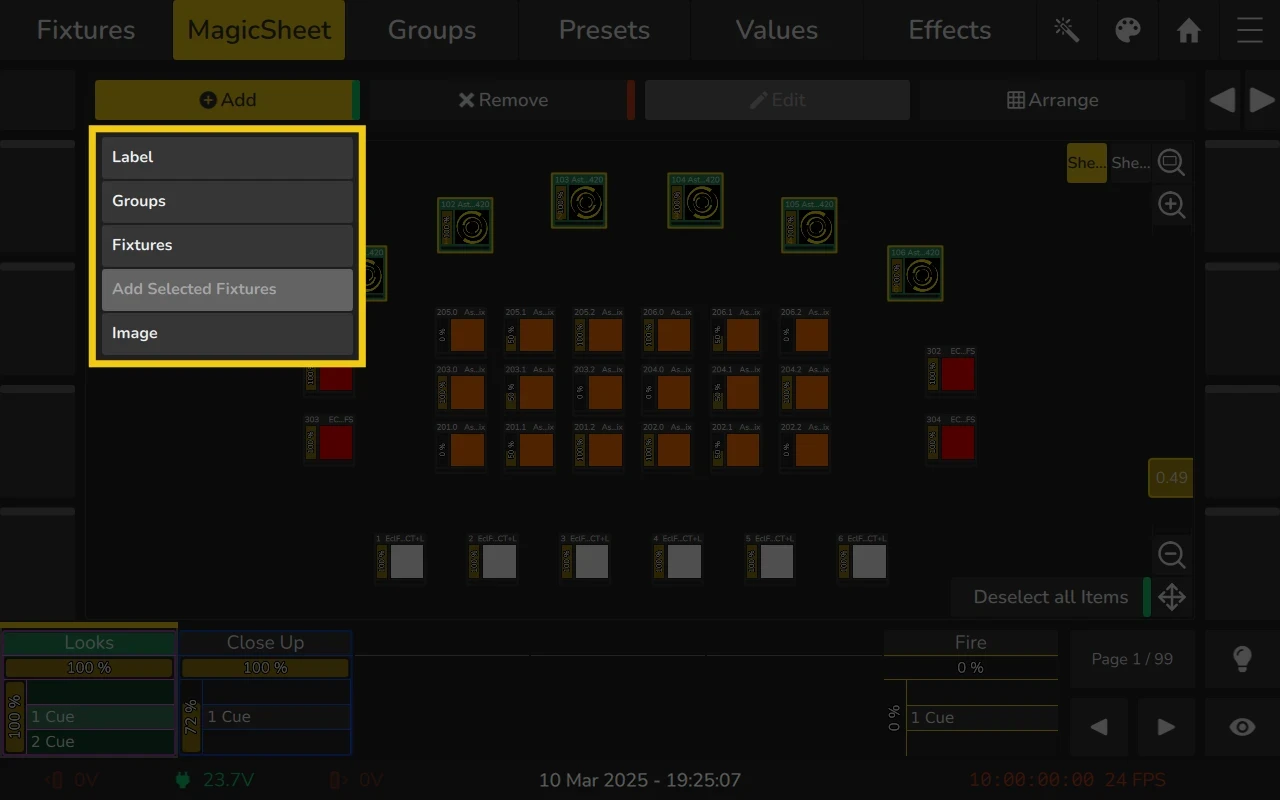
The Add button is used to add various items to the Magic Sheet. The available options are:
- Label: Adds a label to the Magic Sheet View.
- Groups: Adds a group item to the Magic Sheet View.
- Fixtures: Adds fixtures to the Magic Sheet View. This option is only available for fixtures that have not yet been added to the view.
- Add Selected Fixtures: Adds the currently selected fixtures to the Magic Sheet. This option is only available for fixtures that have not yet been added to the view.
- Image: Adds an image to the Magic Sheet View.
The Remove button is used to delete selected items from the Magic Sheet.
The Edit button allows you to modify the settings of labels or images contained in the Magic Sheet. You can:
- Set or edit the text and color of a label.
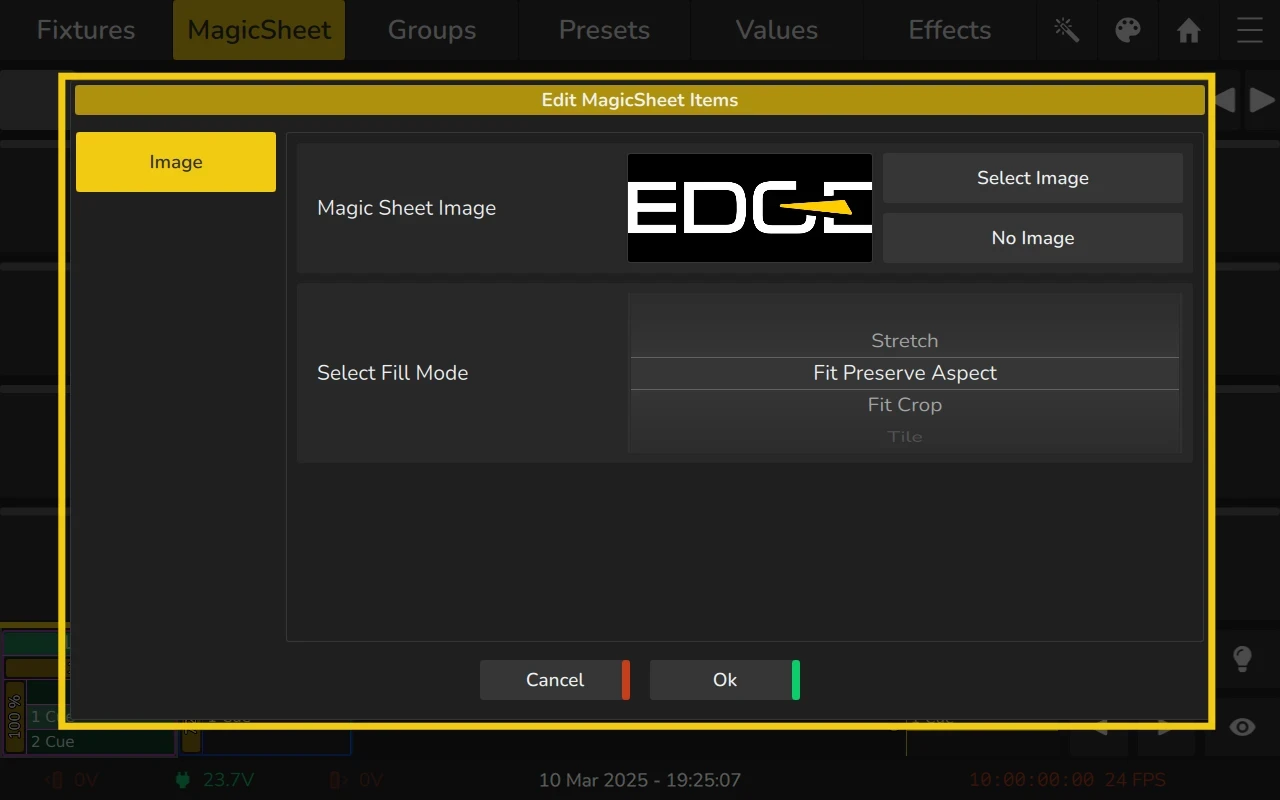
- Change the settings of an image, such as selecting a different image or adjusting its scaling mode.
The Arrange button is used to quickly arrange multiple elements using on-screen handles. The following arrangement modes are available:
- Arrange Linear: Automatically arranges multiple elements in a straight line.
- Arrange Grid: Automatically arranges multiple items in a grid layout.
- Arrange Chessboard: Automatically arranges multiple items in a chessboard pattern.
- Arrange Arc: Automatically arranges multiple items along an arc.
- Arrange Circular: Automatically arranges multiple items in a circular pattern.
Adding Elements to the Magic Sheet View
To add items to the Magic Sheet View, press the Magic Wand button and select Edit Sheet. The Edit toolbar will appear at the top. Then, click on Add to open a menu that lists the available items you can add to the Magic Sheet.
Adding Labels to the Magic Sheet
Labels can be used to visually indicate different items or to quickly select them. To add a label:
- Enable edit mode by clicking on the Magic Wand button and selecting Edit Sheet.
- Click on Label within the Add menu.
- Draw a rectangle on the screen by clicking and dragging where you want the label to appear.
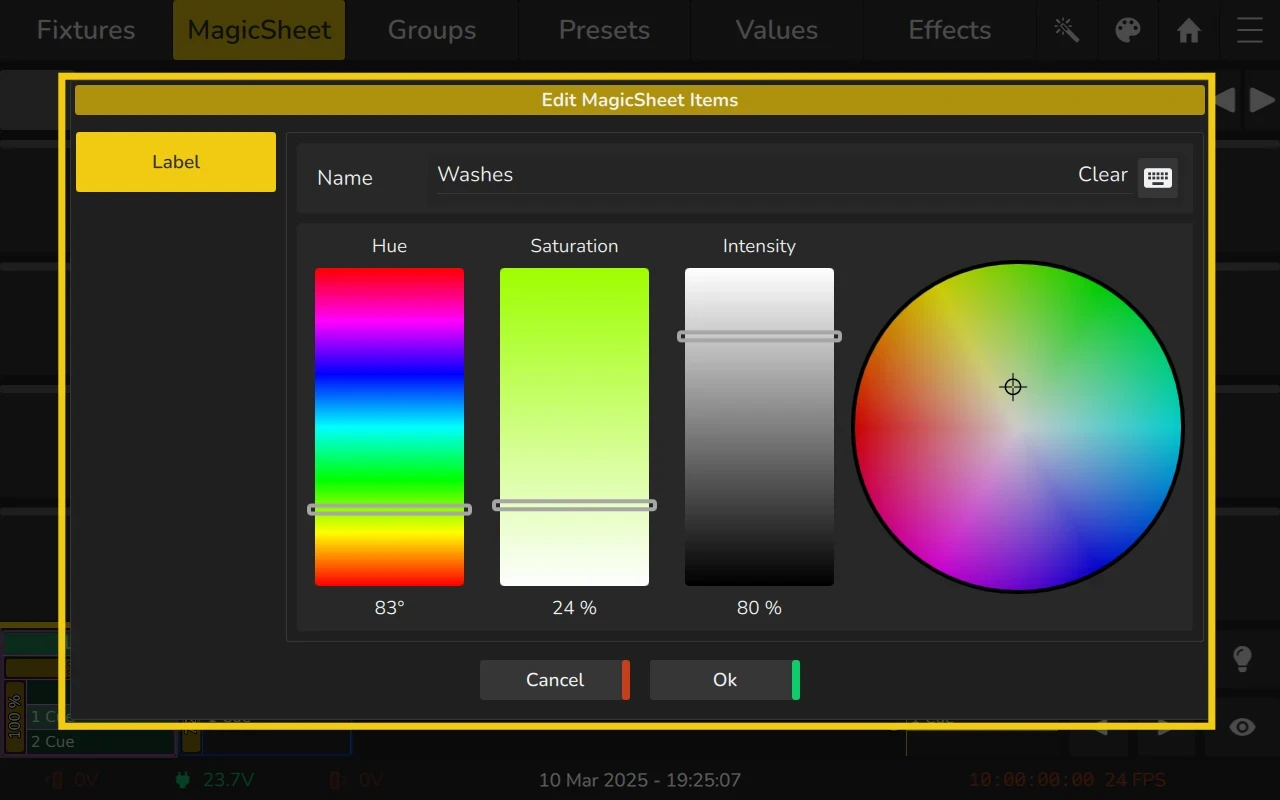
- A window will open to edit the label. You can change the name in the text field and select a color for it.
- Click OK when you're finished.
- Once the label is added, you can:
- Move it by clicking and dragging.
- Resize it using the handle in the lower right corner.
Adding Groups to the Magic Sheet
To add a group to the Magic Sheet View:
- Enable edit mode by clicking on the Magic Wand button and selecting Edit Sheet.
- Click on Groups within the Add menu.
- In the window that opens, select the groups you would like to add.
- Click OK when you're done.
- Once the groups are added, you can move them to the desired location by clicking and dragging or use one of the arrangers to arrange them.
Adding Fixtures to the Magic Sheet
To add a fixture to the Magic Sheet View:
- Enable edit mode by clicking on the Magic Wand button and selecting Edit Sheet.
- Click on Fixtures within the Add menu.
- In the window that opens, select the fixtures you would like to add.
- Click OK when you're done.
- Once the fixtures are added, you can move them to the desired location by clicking and dragging or use one of the arrangers to arrange them.
You cannot add the same fixture to the Magic Sheet twice. If fixtures from the show file are already in the sheet, the Add Fixtures button will be greyed out.
Adding Selected Fixtures to the Magic Sheet
To add selected fixtures to the Magic Sheet View:
- Enable edit mode by clicking on the Magic Wand button and selecting Edit Sheet.
- Click on Add Selected Fixtures within the Add menu.
- The currently selected fixtures will be added to the Magic Sheet.
- Once added, you can move them to the desired location by clicking and dragging or use one of the arrangers to arrange them.
You cannot add the same fixture to the Magic Sheet twice. If fixtures from the show file are already in the sheet, the Add Fixtures button will be greyed out.
Adding Images to the Magic Sheet
Images can be used for backgrounds, visual orientation, or as decorative elements. To add an image:
- Enable edit mode by clicking on the Magic Wand button and selecting Edit Sheet.
- Click on Image within the Add menu.
- Draw a rectangle on the screen by clicking and dragging where you want the image to appear.
- A window to select the image from the Images In Show dialog will open. If you haven't yet imported images, you can do so from this window.
- Click OK when done.
- Once the image is added, you can move it by clicking and dragging, or resize it using the handle in the lower right corner.
For more information on the Images In Show dialog, please check 9 Importing and Managing Images.
Editing existing Elements
Move Items
To move items in the Magic Sheet View in freehand mode:
- Enable edit mode by clicking on the Magic Wand button and selecting Edit Sheet.
- Select one or more items.
- Move the selected items by dragging and dropping them to the desired location.
- To disable edit mode, open the Action dialog and click on Edit Sheet again.
Edit Labels
To change a label’s appearance or size:
- Enable edit mode by clicking on the Magic Wand button and selecting Edit Sheet.
- Select the label you would like to edit in the Magic Sheet View.
- Move or resize the label as needed using the handles shown on screen.
- From within the top toolbar, click on the Edit button.
- A dialog will open, allowing you to set the text and color of the label.
- Click OK when you're done.
Edit Images
To change an image’s appearance or size:
- Enable edit mode by clicking on the Magic Wand button and selecting Edit Sheet.
- Select the image you would like to edit in the Magic Sheet View.
- Move or resize the image as needed using the handles shown on screen.
- From within the top toolbar, click on the Edit button.
- A dialog will open, allowing you to define the image source and fill mode.
- Click OK when you're done.
Removing Items
To delete an item from the Magic Sheet View:
- Open the Action Dialog by clicking on the Magic Wand button.
- Enable the Edit Sheet mode.
- Select the items you would like to remove in the Magic Sheet View.
- Click on Remove in the top toolbar.
- A confirmation dialog will appear.
Arranging Existing Elements
The Arrange feature automatically positions multiple items in the Magic Sheet View. It is useful for quickly organizing items in a specific layout without having to manually adjust their positions. The available arrange modes—Linear, Grid, Chessboard, Arc, and Circular—provide different ways to place the items based on the selected mode, saving time when arranging many elements.
You can arrange items in the Magic Sheet View using one of the available arrange modes:
- Press the Magic Wand button to open the Action Dialog and enable Edit Sheet mode.
- Select the items you would like to arrange in the Magic Sheet View.
- Once Edit Sheet mode is enabled, click on the Arrange menu in the editing toolbar and select an arrangement type.
While the Edit Sheet mode is enabled, you can also move selected items freely on your sheet.

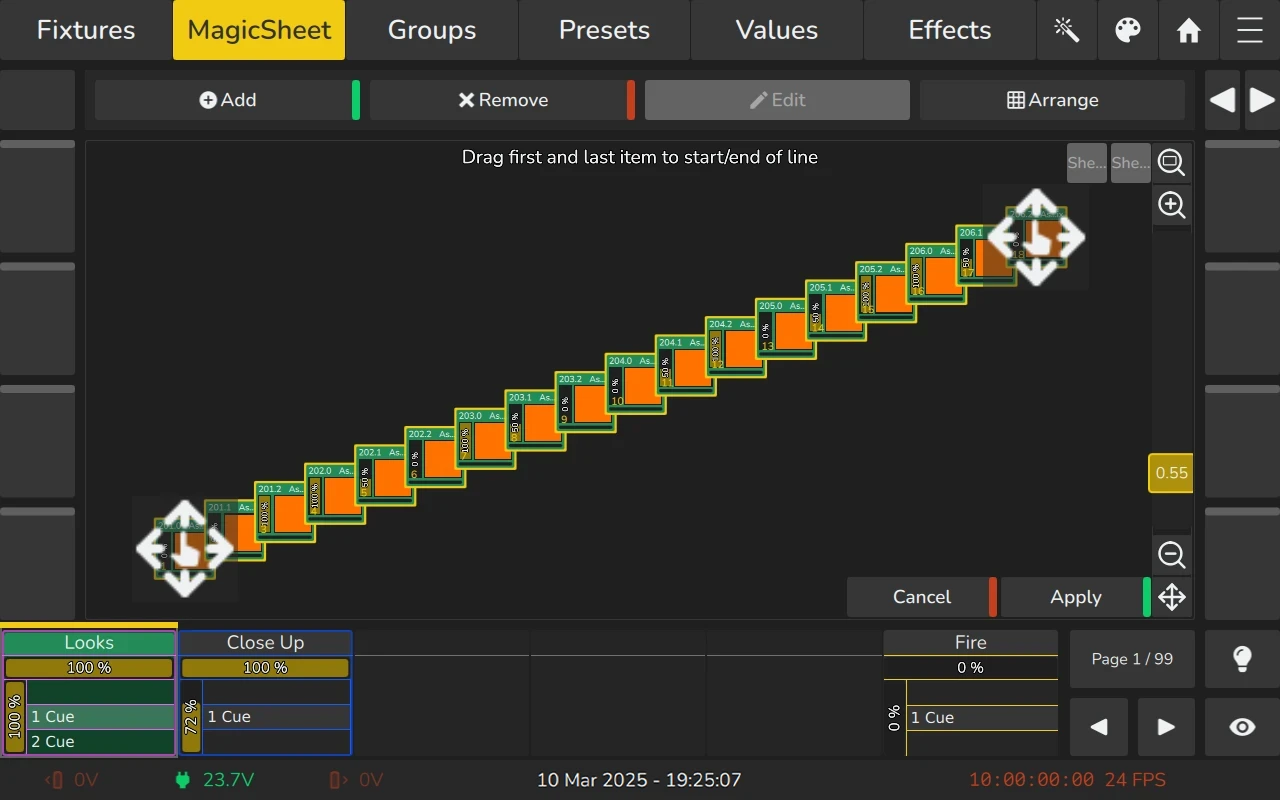
Arrange Linear
The Arrange Linear mode arranges all selected items in a straight line, allowing you to specify the start and end points using drag handles. To arrange items in this way:
- Enable Edit Sheet mode by clicking on the Magic Wand button.
- Select the items you would like to arrange in the Magic Sheet View.
- Click on Arrange.
- Click on Linear in the Arrange list on the top toolbar.
- Adjust the start and end points of the line using the drag handles.
- When you're done, click on Apply in the lower right corner.
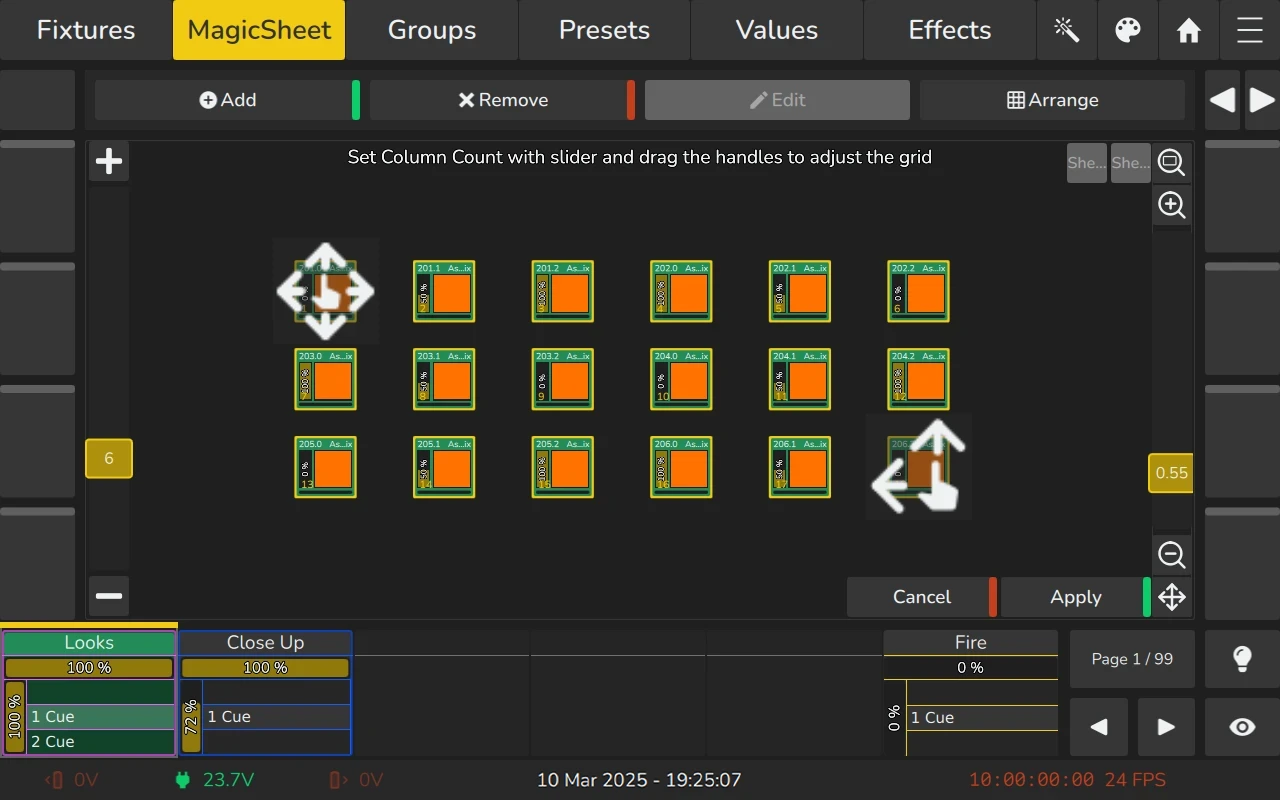
Arrange Grid
The Arrange Grid mode arranges selected items in a grid, allowing you to specify the position and size of the grid using drag handles. The slider on the left determines the number of columns. To arrange items in a grid:
- Enable Edit Sheet mode by clicking on the Magic Wand button.
- Select the items you would like to arrange in the Magic Sheet View.
- Click on Arrange.
- Click on Grid in the Arrange list.
- Adjust the start and end points using the drag handles, and change the number of columns using the slider on the left.
- When done, click Apply.
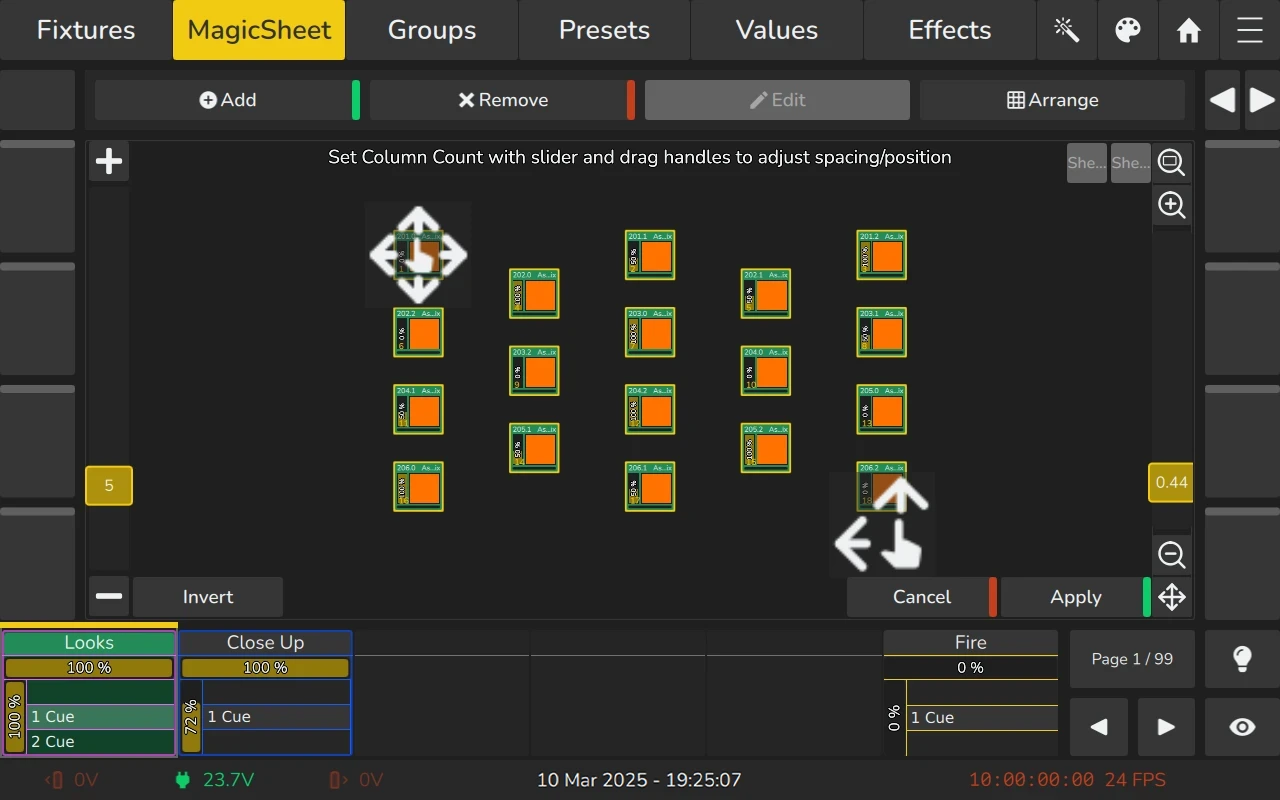
Arrange in a Chessboard
The Arrange Chessboard mode arranges selected items in a chessboard-style grid, occupying every other spot. It allows you to specify the position and size of the chessboard using drag handles, and the slider on the left determines the number of columns. There is also a button next to the slider to invert the arrangement. To arrange items in a chessboard pattern:
- Enable Edit Sheet mode by clicking on the Magic Wand button.
- Select the items you would like to arrange in the Magic Sheet View.
- Click on Arrange.
- Click on Chessboard in the Arrange list.
- Adjust the start and end points using the drag handles, and change the number of columns using the slider on the left.
- Optionally, use the Invert button next to the slider to change the arrangement direction.
- When done, click Apply.
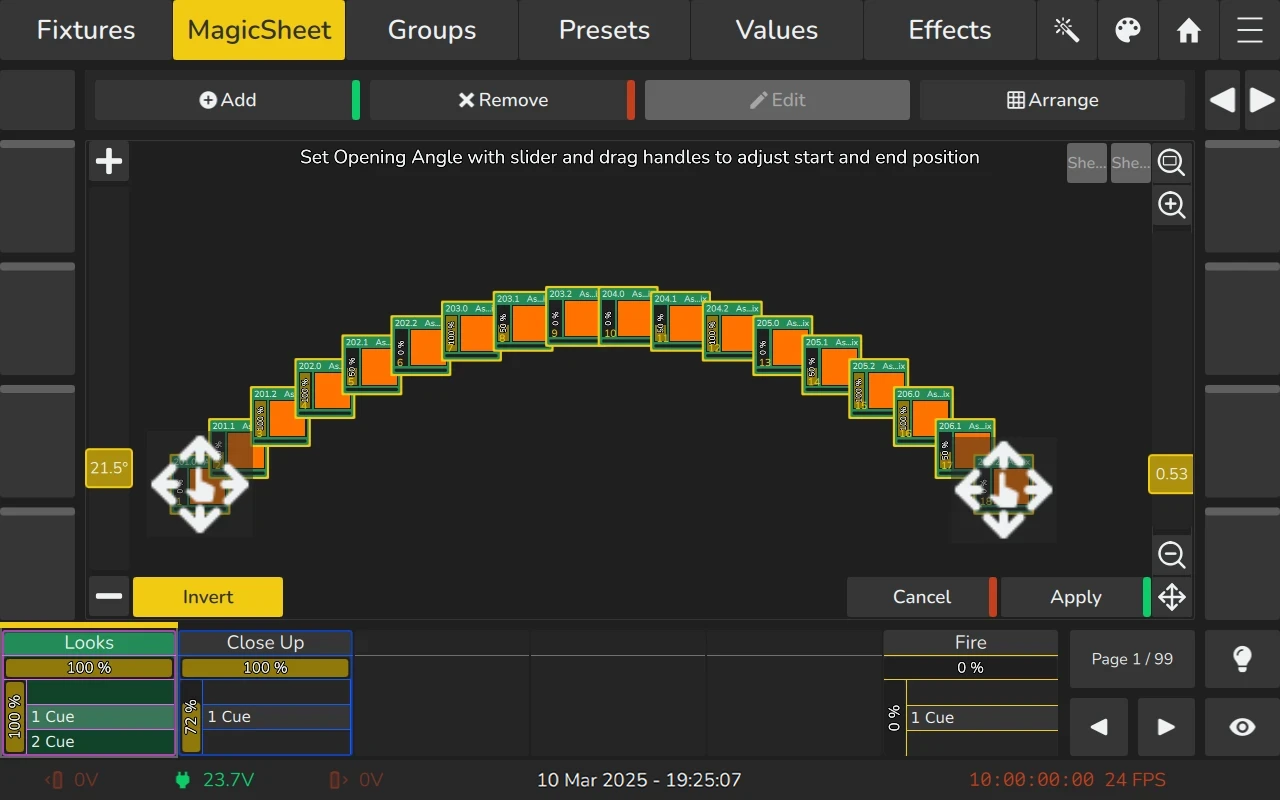
Arrange Arc
The Arrange Arc mode arranges selected items in an arc, allowing you to set a start point, radius, and endpoint using drag handles. To arrange items in an arc:
- Enable Edit Sheet mode by clicking on the Magic Wand button.
- Select the items you would like to arrange in the Magic Sheet View.
- Click on Arrange.
- Click on Arc in the Arrange list.
- Adjust the start and end points using the drag handles, and change the radius using the slider on the left.
- Optionally, click the Invert button in the lower-left corner to adjust the direction of the arc.
- When done, click Apply in the lower right corner.
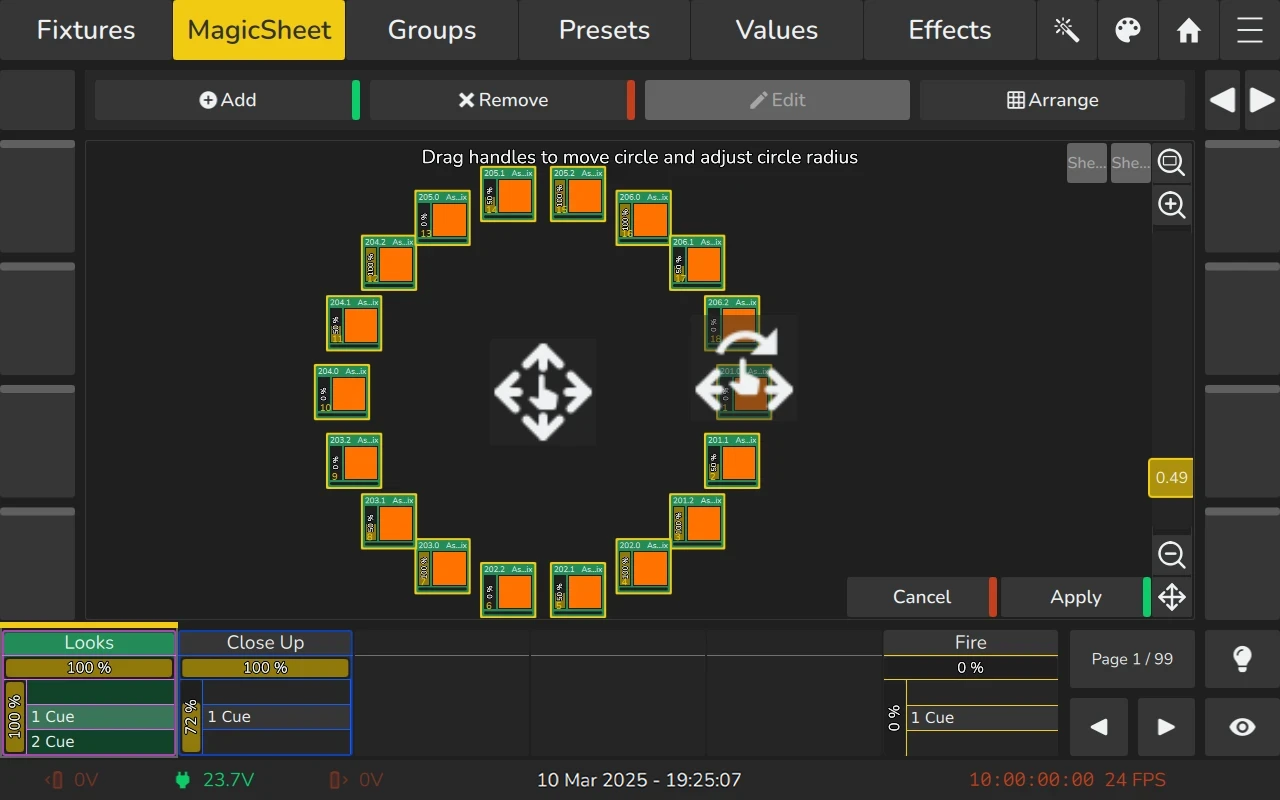
Arrange Circular
The Arrange Circular mode arranges selected items in a circle, allowing you to specify the center point and size/rotation using drag handles. To arrange items in a circle:
- Enable Edit Sheet mode by clicking on the Magic Wand button.
- Select the items you would like to arrange in the Magic Sheet View.
- Click on Arrange.
- Click on Circular in the Arrange list.
- Adjust the center point, size, and rotation using the drag handles.
- When done, click Apply.