Inputs section
5.3.9 OSC (Open Sound Control)
Open Sound Control (OSC) is a modern network-based communication protocol that can be used to send a variety of control messages between OSC enabled devices.
OSC enables you to use OSC enabled controllers such as a synthesizer, electronic music instruments, production audio software, and mobile phone apps such as TouchOSC to remotely control your console.
Enable Open Sound Control Input
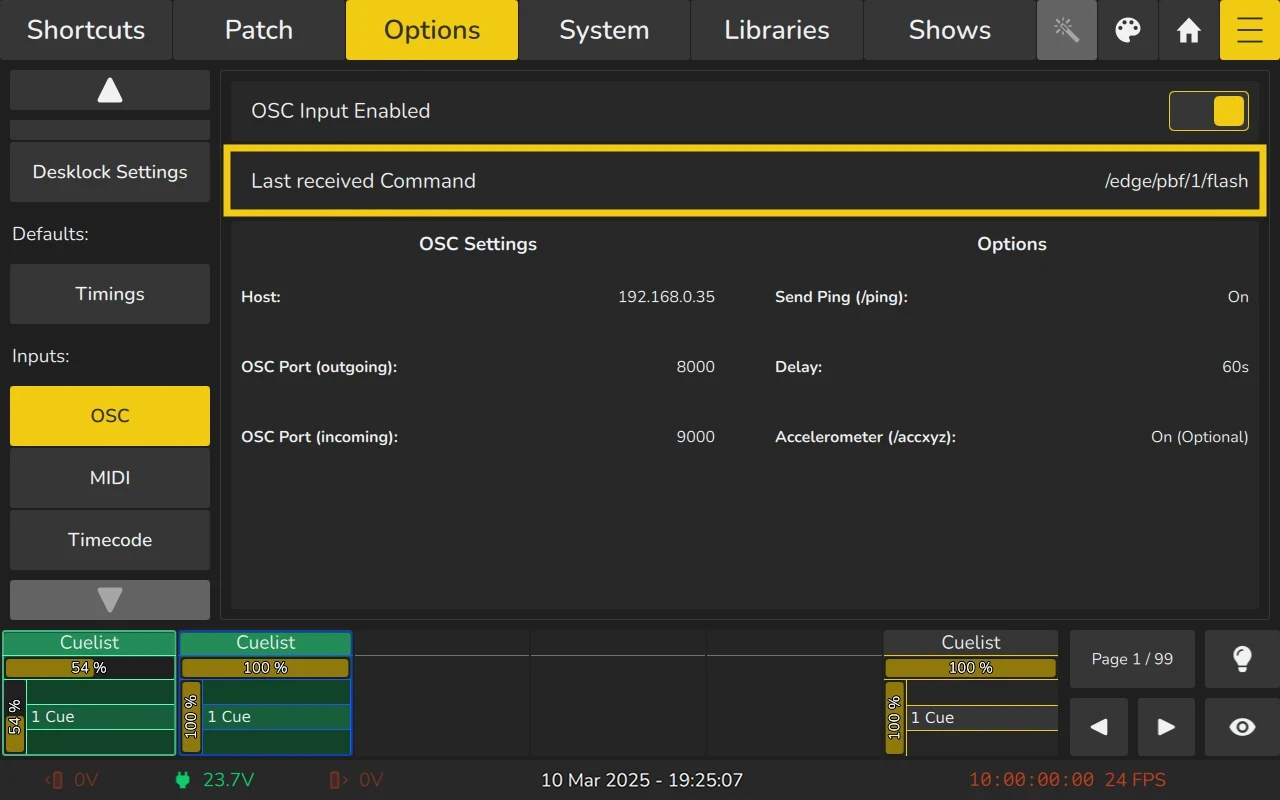
In case you would like to remote control your EDGE console using an OSC Remote (such as TouchOSC for Android or iOS), you need to enable the OSC Input.
The console shows the necessary port numbers for OSC in the OSC Group Box after activation. You can also see incoming messages and the number of connected clients.
To enable or disable OSC, please do the following:
- Open the Menu by clicking the Menu
 button and navigate to the Options tab.
 - Go to the OSC page.
- Toggle the OSC Input Enabled switch to either turn OSC on or off.

Seeing the last received OSC Input
When OSC Input is enabled in EDGE, the console will display details of any incoming OSC messages. These messages are shown next to the Last Received Command text within the OSC page of the Options tab.
This feature provides a quick way to verify and monitor OSC commands being sent to the console for troubleshooting or configuration purposes.
OSC Protocol / Command Specification
The OSC Interface mimics the front panel interface. As such, sending a button in OSC behaves exactly as it would when sent using the physical front panel on the console.
List of the available Commands are avilable here
5.3.10 MIDI In and Outputs
EDGE provides functionality for integrating with external MIDI devices, enabling remote control of the console and communication with other MIDI-enabled equipment. This setup supports both input and output operations.
MIDI Input
MIDI Input enables remote operation of the EDGE console using external MIDI devices.
Supported via:
- Built-in MIDI ports on the back of the console.
- USB-MIDI interfaces.
Note: The built-in MIDI Input is preferred due to its lower latency. USB-MIDI interfaces do not support MIDI Timecode (MTC).
Timecode Input functionality does not depend on enabling general MIDI Input, ensuring seamless synchronization for time-sensitive applications.
MIDI Output
- MIDI Output allows the EDGE console to send MIDI signals to other devices for synchronized control of MIDI-enabled equipment such as lighting or audio systems.
- Generated Timecode is output through the MIDI port on the back of the console.
Supported via:
- Built-in MIDI Output ports.
- USB-MIDI Output ports.
This flexibility supports advanced show control workflows and integration with various MIDI ecosystems.
Enabling the MIDI Input
To toggle the MIDI input functionality in EDGE:
- Open the Menu by clicking the Menu button and navigate to the Options tab.
- Select the MIDI page from the list on the left.
- Use the MIDI Input Enabled switch to turn the MIDI input on or off.
Enabling the MIDI Output
To toggle the MIDI output functionality in EDGE:
- Open the Menu by clicking the Menu button and navigate to the Options tab.
- Select the MIDI page from the list on the left.
- Use the MIDI Output Enabled switch to turn the MIDI input on or off.

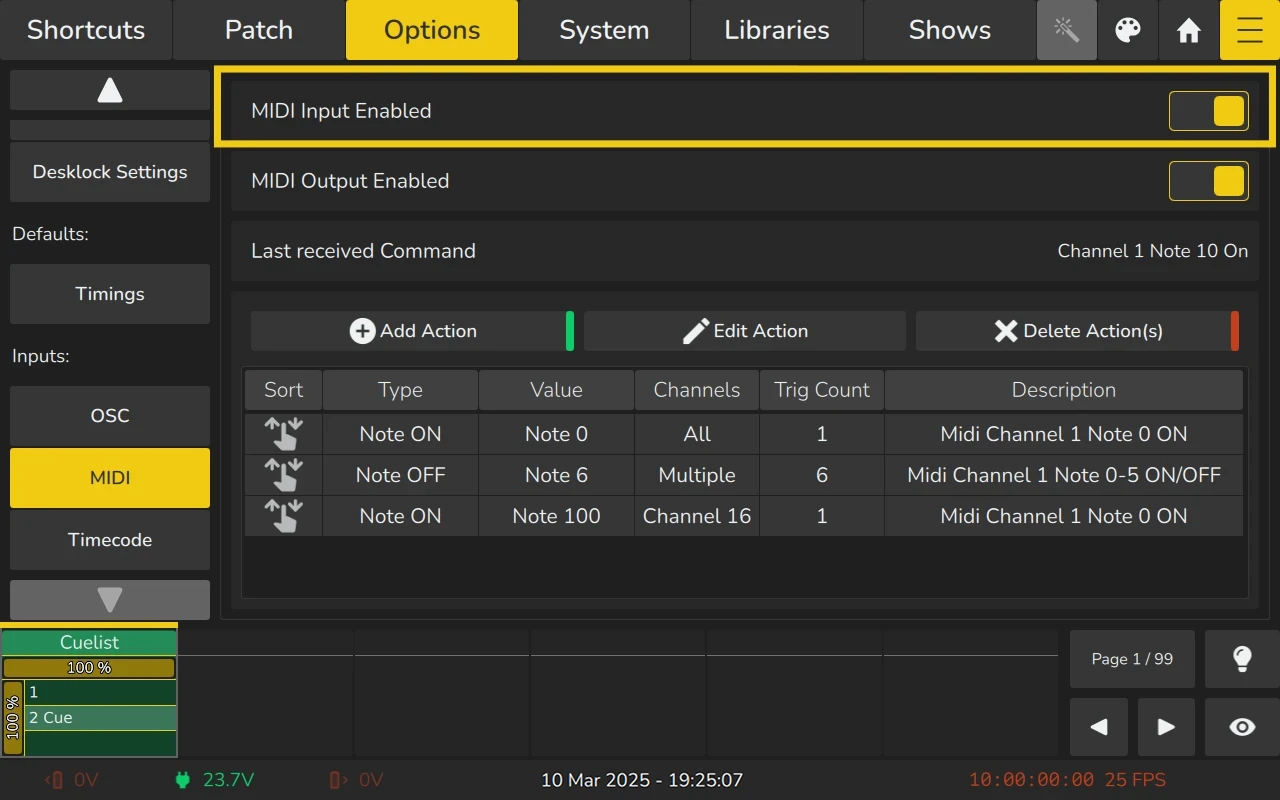
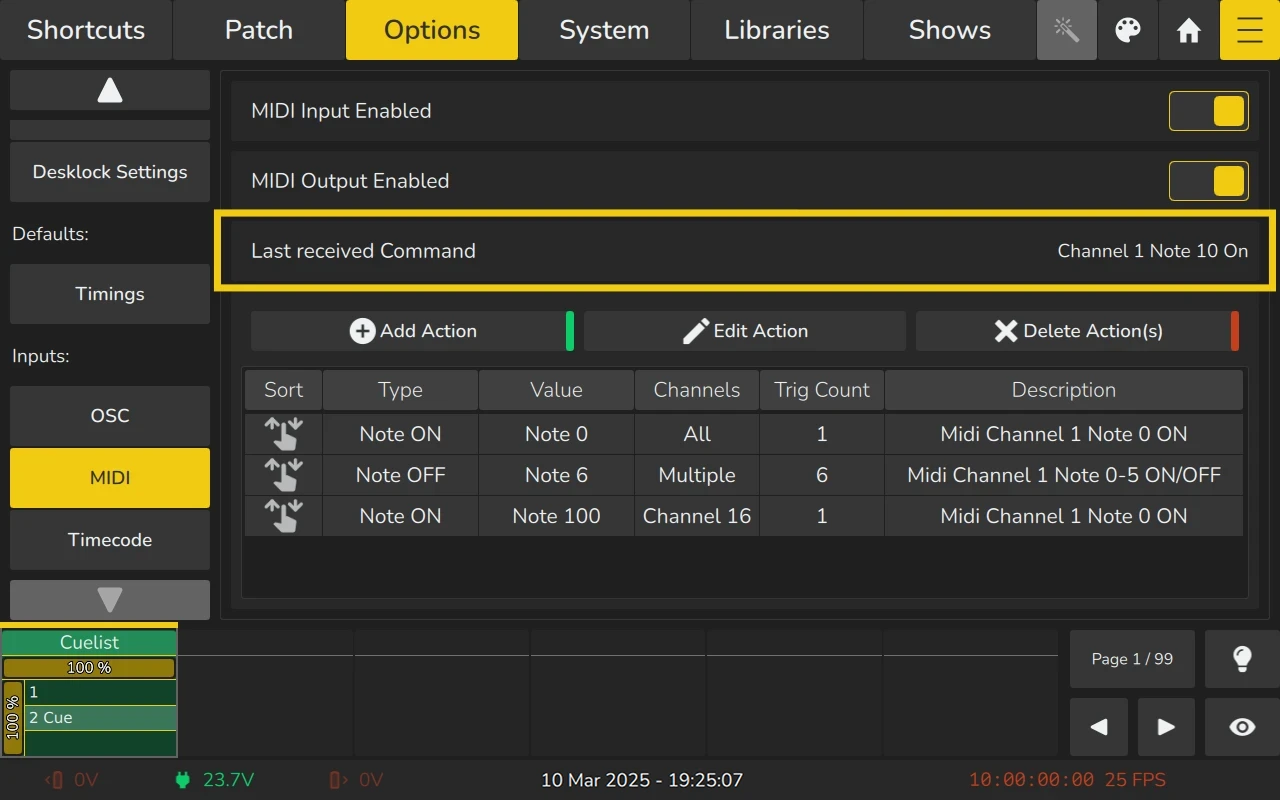
Seeing the last received MIDI Input
When MIDI Input is enabled in EDGE, the console will display details of any incoming MIDI messages. These messages are shown next to the “Last Received Command” text within the MIDI page of the Options tab.
This feature provides a quick way to verify and monitor MIDI commands being sent to the console for troubleshooting or configuration purposes.
Configuring MIDI Actions
MIDI actions allow you to trigger specific functions on the Edge lighting console via external MIDI devices. You can customize the MIDI actions to suit your production requirements.
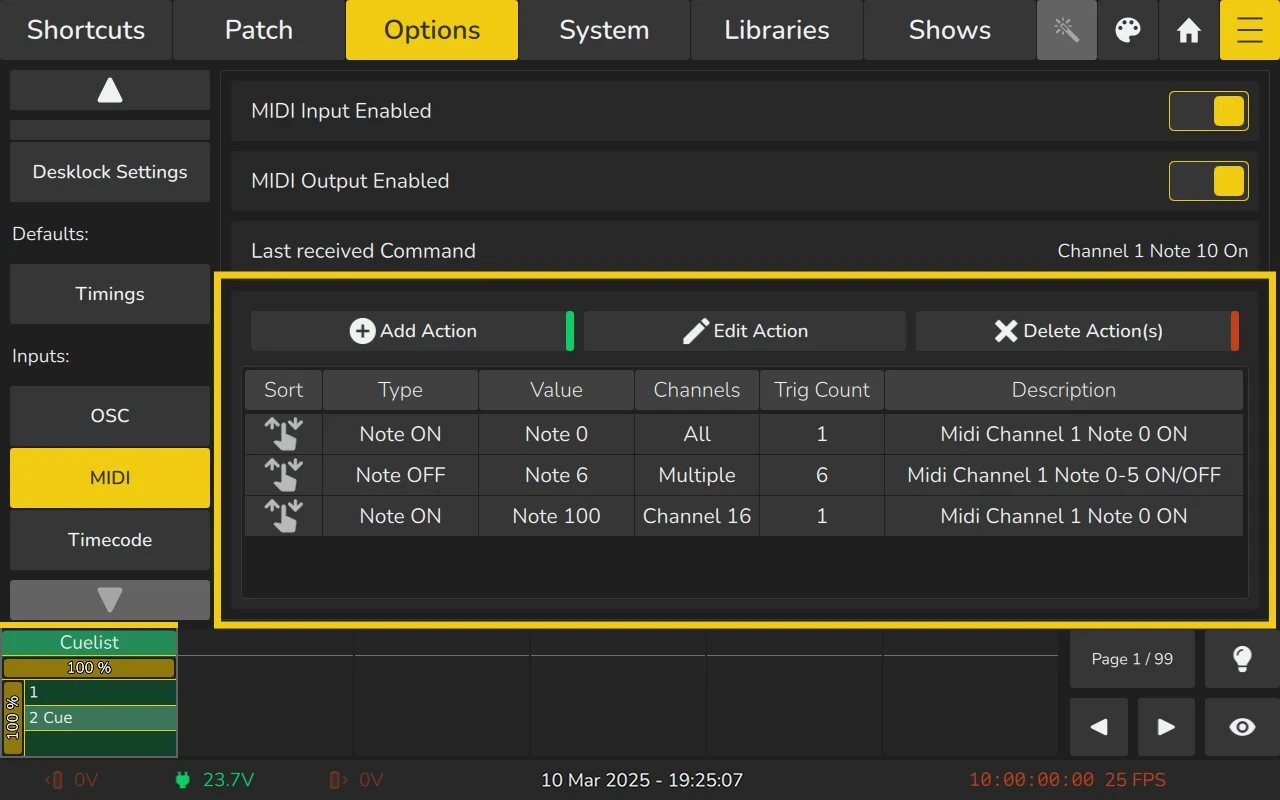
The Midi Input Remote Action Table
The table in the MIDI page displays all configured actions, organized by columns to provide detailed information and manage their order of execution. The table is a powerful tool for controlling how your MIDI inputs interact with the Edge console. Here’s what each column represents:
- Sort: This column allows you to reorder actions by dragging rows. MIDI commands with the same note, control, or program change will be executed in the order they appear in the list, from top to bottom.
Type: Indicates the type of MIDI action. Supported types include:
- Note On
- Note Off
- Note On/Off
- Program Change
- Control Change
- Value: Displays the note or control number associated with the MIDI command. This value is used to match the input from your MIDI controller with the configured action.
- Channel: Shows whether the action is applied to all channels, multiple channels, or a specific channel. This allows for more precise control over which MIDI inputs affect the console.
- Trig Count: Specifies the number of consecutive MIDI notes, program changes, or control changes that need to occur for the action to be triggered. For example, if the Trig Count is set to 5, a single note (e.g., Note 1) can trigger multiple actions sequentially (e.g., Note 1 triggers Cuelist 1, Note 2 triggers Cuelist 2, etc.).
- Description: A brief summary of the action to help identify its purpose. This description ensures you can quickly recognize the action and understand its function within your setup.
List of the available actions and their associated trigger types are avilable here
Adding a MIDI Action:
- Open the Menu by clicking the Menu button and navigate to the Options tab.
- Select the MIDI page from the list on the left.
- Click the Add Action button. This will open the remote action editor, where you can define the specifics of the new MIDI action.
Editing an existing MIDI Action:
- Open the Menu by clicking the Menu button and navigate to the Options tab.
- Select the MIDI page from the list on the left.
- From the table, select an existing action that you wish to modify.
- Click the Edit Action button to open the remote action editor.
Alternatively:- Double-click or long-press a cell in the table to directly access the action for editing.
Deleting MIDI Actions
If you no longer need a specific MIDI action or wish to clean up your configuration, you can delete it directly from the MIDI page. To Delete a MIDI Action:
- Open the Menu by clicking the Menu button and navigate to the Options tab.
- Select the MIDI page from the list on the left.
- In the table, find and select the action you wish to delete.
- Click the Delete Action button. A confirmation dialog will appear to ensure that you intend to remove the action.
- Confirm the deletion in the dialog to permanently remove the selected action from the MIDI configuration.
The Midi Input Remote Action Editor
The Remote Action editor consists of multiple tabs which offer detailed configuration of the Midi Action.
The Trigger Options tab, located on the left side of the dialog, is where you configure which MIDI events the action will respond to. This section allows you to set up the type of MIDI event (e.g., Note On, Program Change, Control Change) and specify the details such as the note, control number, or MIDI channel.
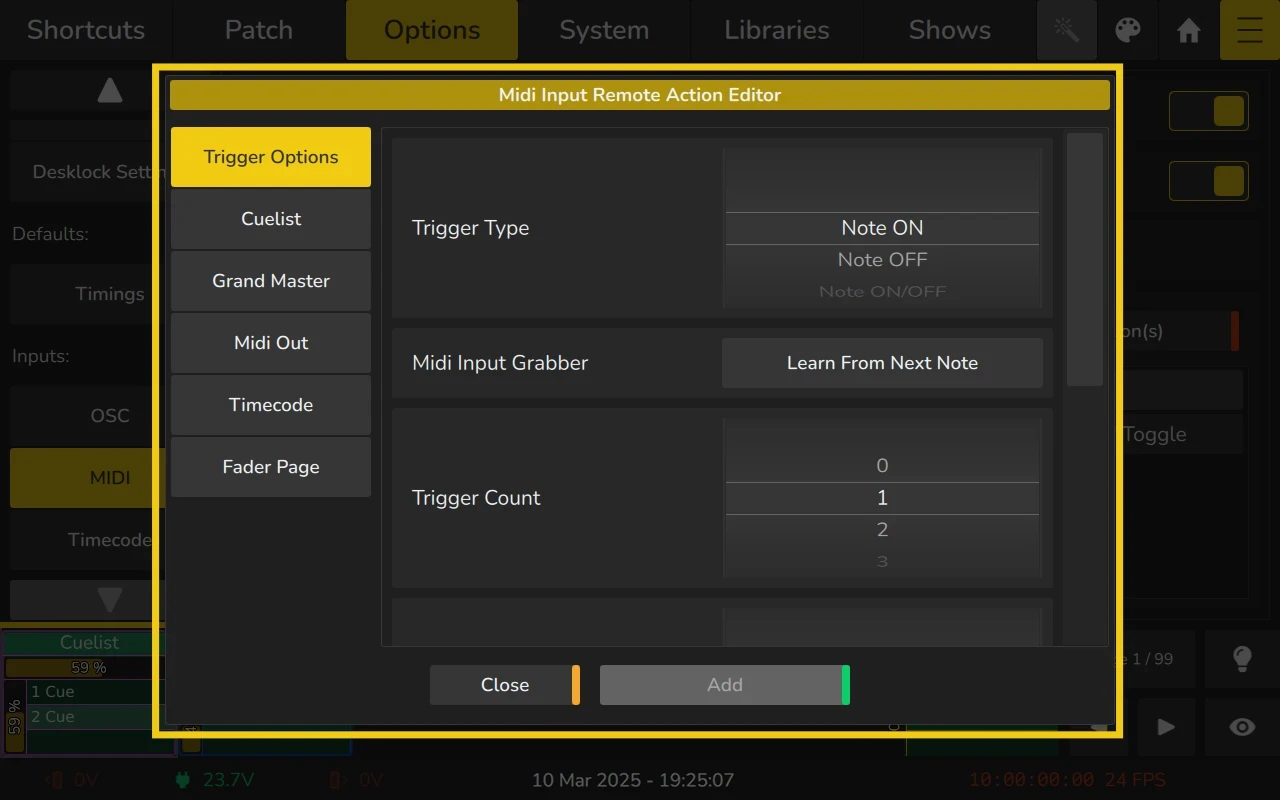
Configuring the Trigger Type and MIDI Event
In this section, you can set the following options:
- Trigger Type: This defines what kind of MIDI event will trigger the action. The available options are:
- Note On: The action is triggered when a MIDI note is pressed.
- Note Off: The action is triggered when a MIDI note is released.
- Note On/Off: This option treats Note On as an "on" signal and Note Off as an "off" signal, allowing both states to control the action.
- Program Change: The action is triggered by program change messages sent by a MIDI controller.
- Control Change: The action is triggered by control change messages, typically used for continuous values like fader or dimmer levels. This is the required trigger type for controlling parameters such as faders or dimmers.
- Trigger Count: This setting allows you to specify the number of consecutive MIDI events (e.g., notes or control changes) required to trigger the action. For example, setting a trigger count of 5 would require 5 consecutive events to activate the action.
- Note or Program- and Control-Change Number: Depending on the trigger type, you will specify either the note number (for Note On/Off) or the program / controller number (for Program Change or Control Change). This is the specific MIDI value that the action will respond to.
- MIDI Channel: This option allows you to specify which MIDI channel(s) the action will respond to. You can select a specific channel, multiple channels, or all channels. This is useful for controlling actions based on specific MIDI devices or for routing MIDI from different sources.
- Learn Mode: The Learn button simplifies the configuration process. When activated, you can send a MIDI signal (note, control change, or program change) from your MIDI controller, and the system will automatically detect the signal and set the corresponding parameters (note number, control number, channel, etc.).
Trigger Type-Specific Controls
List of the available actions and their associated trigger types are avilable here
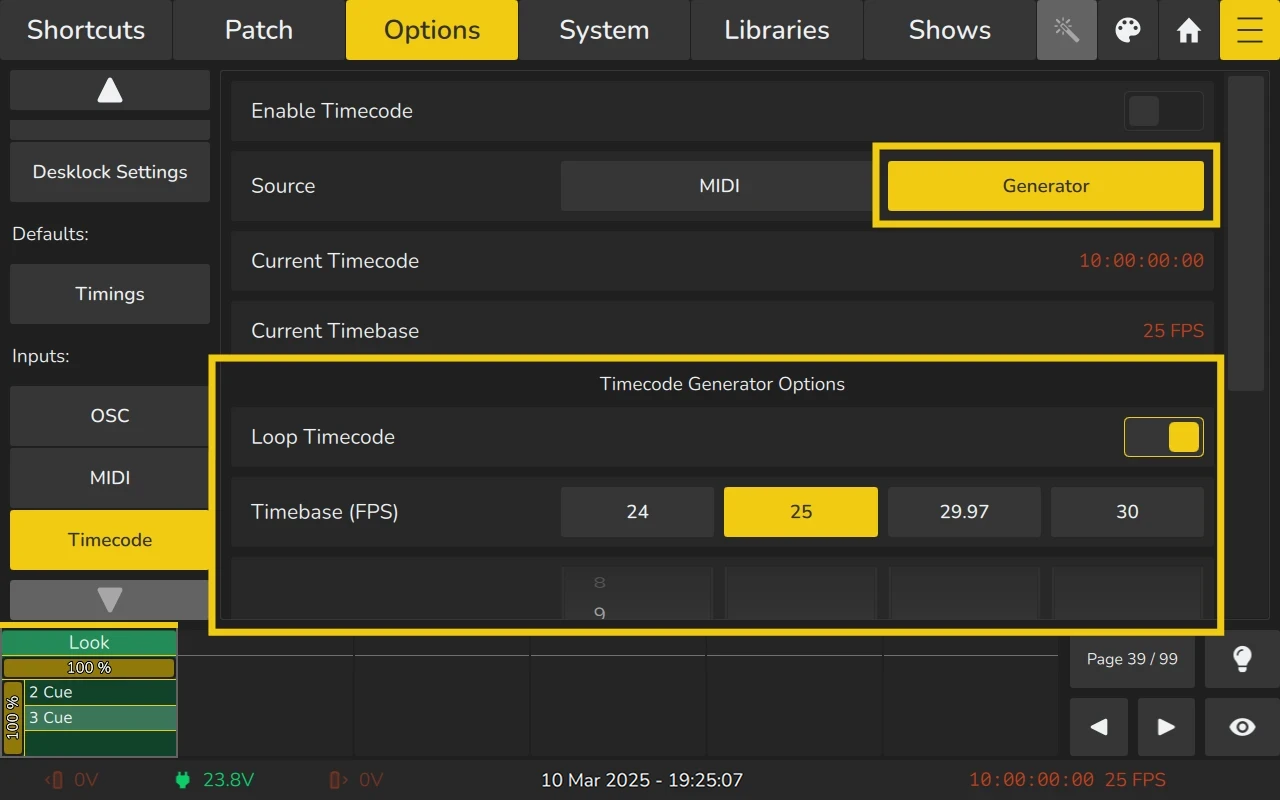
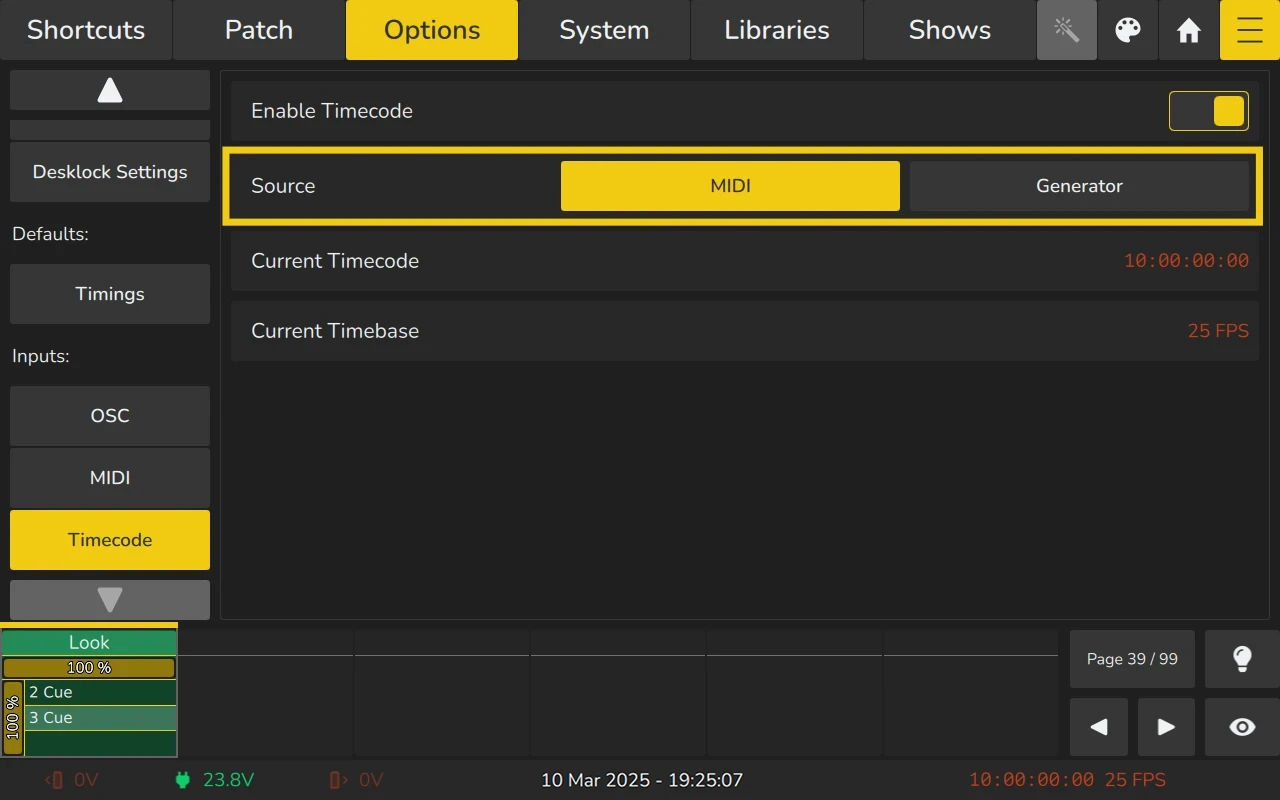
5.3.11 Timecode
EDGEs ability to synchronize playbacks to an incoming Timecode signal may be used to keep your lighting and rest of the production in sync.
You may set your timecode to an external MIDI or internal generator source.
For external sources, EDGE automatically recognizes the framerate of your incoming timecode signal and displays the current timecode status within the timecode settings and timecode label in the status bar. No further settings are required.
The console will always listen to the timecode, however Cues are only triggered if the Timecode is enabled on the Timecode page of the Menu.
MIDI does not need to be enabled in order to receive MIDI Timecode.
Enabling / Disabling Timecode
You may enable or disable the timecode input globally as follows:
- Open the Menu by clicking the Menu button and navigate to the Options tab.
- Click on Timecode.
- Set the Enable Timecode switch to on or off.
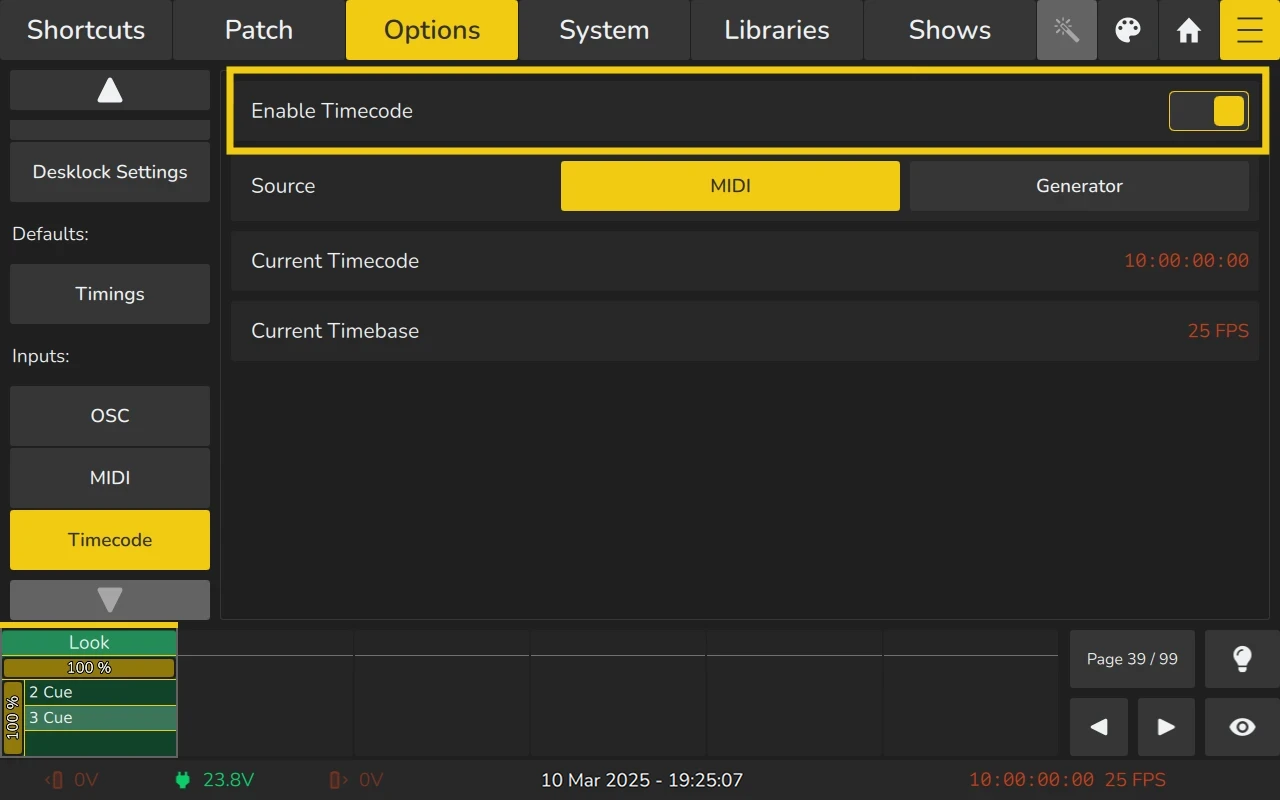
Selecting the timecode source
Here's how to set the global timecode source:
- Open the Menu by clicking the Menu button and navigate to the Options tab.
- Click on Timecode.
- Select MIDI or Generator as the source.
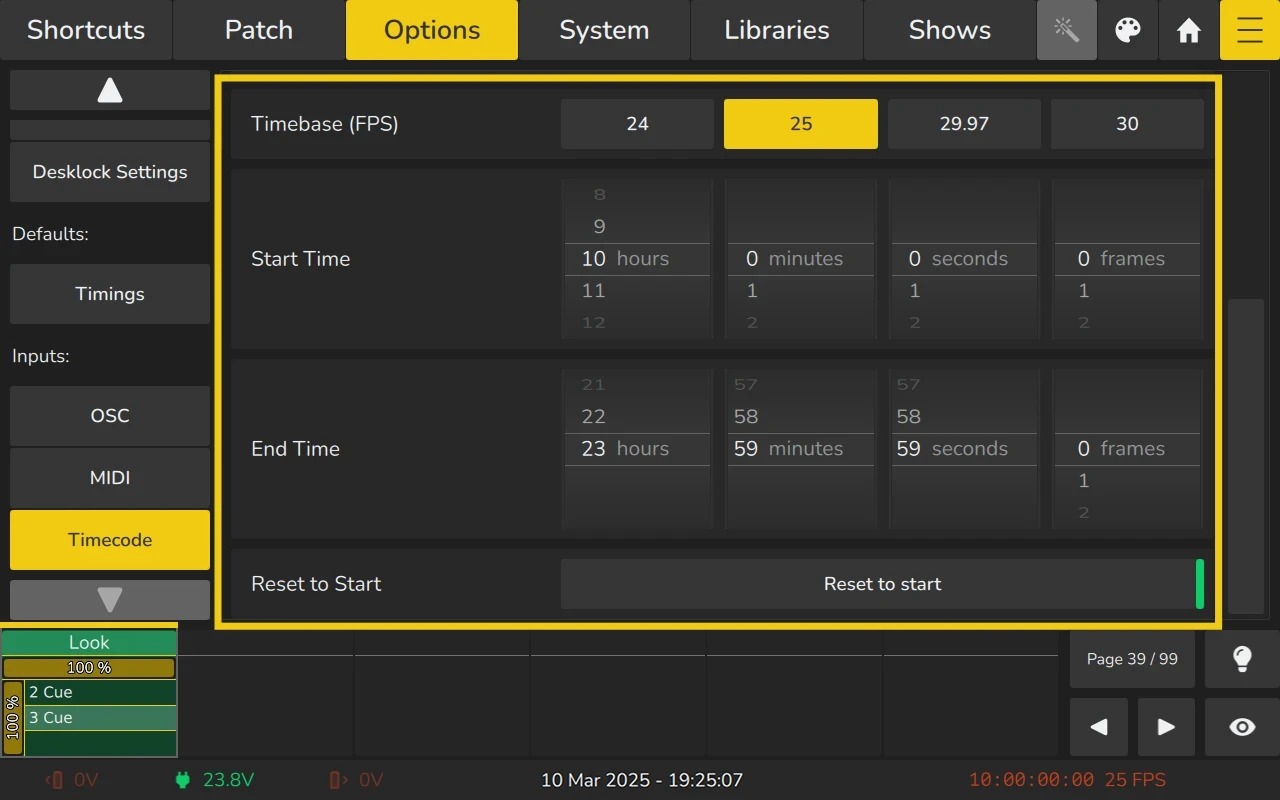
Timecode Generator Settings
The EDGE allows you to define the framerate, start time, and stop time for the internal timecode generator.
- Framerate: Set the desired frame rate for the timecode output.
- Start Time: Define the starting point for the timecode.
- Stop Time: You can specify when the timecode should stop. If looping is enabled, the timecode will reset and start again from the start time once it reaches the stop time.
The generated timecode will be output through the MIDI Out connector and will only be active if timecode is enabled.
To restart the timecode generator, click on Reset to Start.